


With the major assembly completed, all that was left was finishing, wiring and installing the glass and mirrors. The glass sides and front are held in the channels by 1/4" X 3/8" strips of oak, which I cut from some of the scrap pieces I had laying around. I had to make sure that I cut enough, and that they were of the right length. I wound up cutting 22 pieces, approximately 36 to 41 inches long. I didn't take any pictures, because frankly it wasn't that interesting to look at.
I then turned to finishing the project. I started with staining all of the pieces. After some experimentation with different colors (including mixing some of my own) I wound up using Minwax Ipswitch Pine. This color was a pretty close match to the rest of the furniture in our living room where the curio cabinet would go. Once I got the stain applied, my wife fell in love with the color. Seeing as the cabinet was built for her, this is a good thing!
For a top coat, I used Minwax semi-gloss poly. Usually I like to mix the poly 50/50 with either mineral spirits or naptha, then wipe it on. This approach to finishing has given me great results. However, with this project I ran into two dilemmas:
1. My basement ceiling was too low, so I couldn't stand the curio upright for finishing. This means I would have to apply the poly to the carcass in several steps, turning it as I go. I've found it to be a lot trickier to keep the thinned poly from running onto a side that has been finished than the thicker, undiluted stuff.
2. The sheer size and number of surfaces and corners of this project meant that sanding time between coats of poly would take a long time. Thinning the poly meant that I would have to put twice the number of coats on the project, which would cause my sanding time to double as well. Not something I was looking forward to.
So, I bit the bullet and applied three coats of straight poly with a foam brush, taking extra care to lay it on as smooth as I could. I sanded between coats with 0000 steel wool. The final result isn't as good as it would have been had I wiped the finish on, but frankly, I'm probably the only one who will ever notice. In addition, the finishing process took me three weeks using this method. Taking six weeks to finish the cabinet would have driven me bonkers.
After the finish dried, I carefully measured the piece, then ordered the glass from a supplier down the street. The side and front pieces are all double-strength (full 1/8" thick). The mirrors are single strength. The three shelf pieces are 1/4" thick. There was a lot of glass in this project, and it wound up costing me a little over $200 plus tax. The mirrors were especially expensive, coming in at around $30 and $45 for the two pieces.
On a side note, the glass shop accidentally cut one of the mirrors wrong. I picked up the glass on a Friday afternoon, and discovered this goof that evening. The glass shop didn't open again until Monday morning, so my weekend plans were somewhat thwarted. As it turned out, I accidentally broke one of the side pieces by way of a nail-gun mishap. When I went back to get the mirror replaced with the correct sized piece, I had to have them re-cut the piece I broke as well. They were nice enough to give me the replacement piece for free, as compensation for the trouble with the mirror.
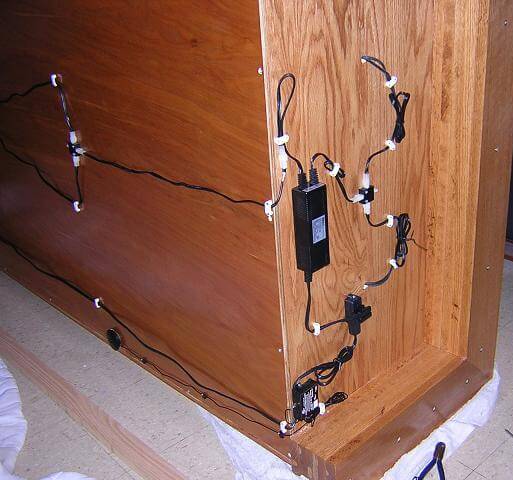
I then installed the lighting system, which is comprised of four halogen lights, a transformer, a couple of power blocks, a dimmer module and a on/of/dimmer switch. There wasn't much to this other than following the wiring instructions that came with the light kit. I tried to make the wiring look as neat as possible, although nobody will ever see it. I sleep better at night, though:
Next, I installed the mirrors. I placed mirror mastic (glue) on the inside back of the curio, then carefully laid the mirrors in place. I had a few minutes where I could wiggle them to make sure the gaps on the sides were even, then once they were positioned correctly, I pressed the mirrors down into the mastic and left the curio to sit on it's back for 24 hours to let the mastic dry.
To put the glass in place, I mitered the glass stops to length, then tacked them in place with my brad nailer (5/8" brads). To help cut the stops, I made the following little cutting jig:

Next, I got to discover how much fun it is to try an clean the glass in a cabinet this size. Hmmm, which side of the glass is that finger print on? I spent a good two hours cleaning everything, and I can still see little smudges and fingerprints at certain angles. Arrrrgh!
The last step of the project was finally here! Carrying the cabinet out of the basement and setting it up. With all the glass, the cabinet was in the range of 175 pounds, and the door was another 60. Add an additional 50 pounds for the glass shelves, and the total dry weight of the curio is over 250 pounds. I conned a burly guy I work with to come over and help move the pieces up to the living room. I should have gotten pictures of that process! We set it in place, put the shelves in and hung the door. A little more polishing and glass cleaning, and the project was done at last!
See the finished results! On To The Curio Cabinet main page...
Back to where we finished construction of the door.
Return To The Main Wood Gallery
This page last updated on 06/28/2018