


The end of this project is looming. It was now time to apply the finish. There are many finish options for a guitar. Everything from a light oil finish (i.e. tung oil) all the way up to a heavy, plasticized acrylic finish. Most luthiers would agree that the choice of finish has more of an impact on an acoustic instrument than an electric one, so my choice of finish was based on ease of applying rather than tone.
Probably the most common guitar finish is a sprayed-on nitro cellulose lacquer. I have done finishes like this previously (albiet not on a guitar) and have been able to get pretty good results. Ideally, this is the finish I would like to have used on this guitar.
However, my shop is in the basement of my house, and the lacquer fumes are pretty potent. I didn't want to stink up the whole house and subject my family to the stench over the holidays. I have a garage which I have used to spray finishes before, however it is currently winter here in South Dakota. This morning the temperature was -4 degrees (Farenheit) which isn't too condusive to spraying finishes. Not to mention freezing my patooties off.
So, I decided to give a brushed-on, water based finish a try. I have heard that these finishes can be difficult to get a good shine, and that getting color applied evenly is also a trick. I would think that a sunburst finish would be all but impossible with a brushed-on finish. Given my situation, however, I decided to go with the brushed on finish. If it turns out terrible, I'll either chalk this first guitar up to experience or strip it down in the spring and spray it. I purchased a water-based brushing varnish from Stew-Mac.
Just as an FYI for anyone who orders this finish, beware. The can I recieved was very rusty. I'm guessing it had sat on their shelf for quite a while before it was shipped to me (not a fast moving item?) When I opened it up, and started stirring, there were lots of chunks floating around in the finish, like a good portion of the bottom of the can had hardened, and broke loose in shipping. I wound up having to strain the whole can of finish through some cheesecloth a few times to get rid of the chunks. It was pretty bad. Once strained and stirred, from all looks and appearances (and smells) my best guess was that this was just water-based polyurathene, at about twice the price of what I can get it at my local home center. I've been mostly happy with products I've received from Stew-Mac, but this particular item was a disappointment. Your results may vary, but don't tell me I didn't warn you!
The first step in finishing, regardless of the topcoat type, is to sand the bejeebers out of the whole guitar. I started with 150 grit, then moved to 220 and finally 320. I took my time and made sure I got every bit of the guitar sanded smooth. Thankfully, a guitar has much less surface area than say, a curio cabinet, so within a half an hour I was satisfied with how it looked.
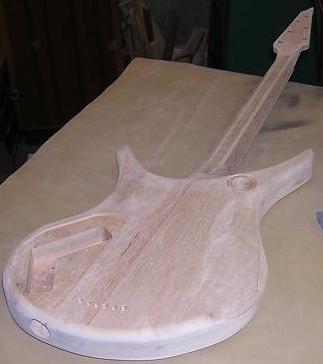
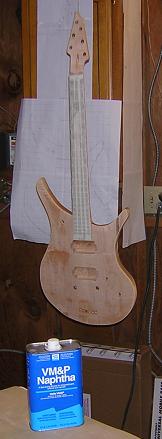
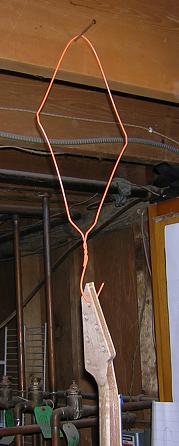
Because I would be putting coats of finish over the entire guitar, I needed a way to suspend the guitar so that the wet finish wasn't marred by setting on something. I filed a picture hanger to a sharp point, then hung it from the ceiling with thread on a nail. I tested my suspension device to make sure it would support the weight of the guitar. Nothing would be more distressing than to have the guitar almost done, then have it come crashing to the floor!
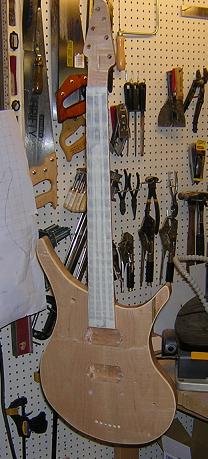
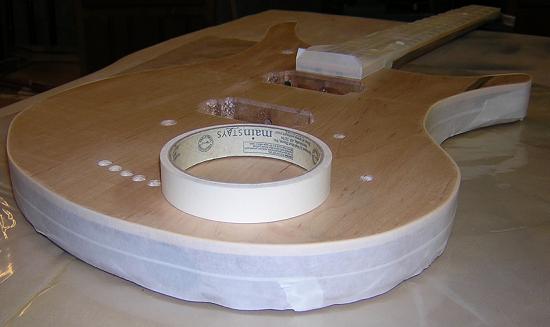
Because an ebony fretboard is left unfinished, I masked it off. I did leave the binding on the sides of the fretboard exposed, though.
Of course, it's always a good idea to wipe the project down with Naptha prior to each coat of finish. It removes dirt, finger grease and the little bits of dust that are still hanging around.
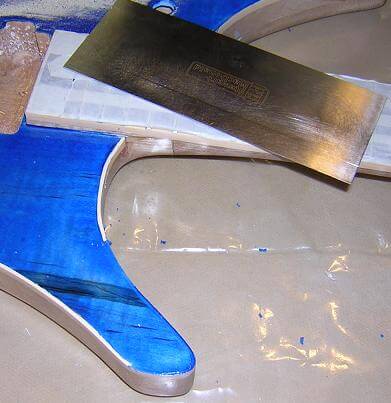
Because a large portion of the guitar is made out of mahogany, and mahogany is an open-pored wood, I needed to fill the grain. I used a water based grain filler from Stewart MacDonald. Prior to applying it, I did a quick sealer coat of finish thinned by 50% with water. This helps prevent the grain filler from being absorbed into the wood instead of building up in the pores.
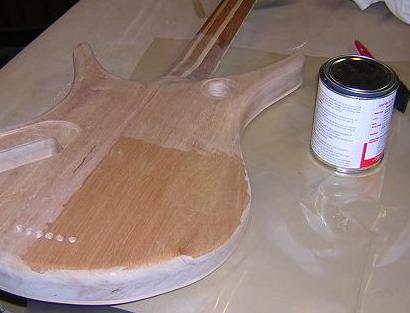
The instructions on the grain filler can stated to apply the filler liberally to a 6" square area, let it dry about five minutes, then scrape off the excess at a 45 degree angle to the grain. I ran into several problems when trying to do this. First, putting the filler on in heavy coats made spots where the filler dried into large bumps/runs that took a lot of sanding to remove. The other problem I ran into was scraping off the excess; either I would lift all of the filler out of the pores, or because of all the curves and crevices, I wouldn't get any of the excess filler off.
So, after muddling through a coat of filler by following the directions, I decided to try a little experiment. Rather than putting on the filler liberally, I put the filler on very thin. I wiped it in the direction of the grain, and applied it like finish so there weren't any runs or thick spots. I applied filler to the whole guitar. Then after it dried I sanded the whole guitar down with 320 grit paper and repeated the process.
After three coats of filler, I was satisfied with how much of the grain had filled in. It wasn't 100% level, but it was close enough where the coats of finish should be able to fill in the remaining pores. Now it was time to move on to the final finish.
The instructions on the can of finish I am using said to begin by giving the project two "sealer" coats of finish thinned 50% with water. So I did. I scuff sanded with 320 grit sand paper between coats.
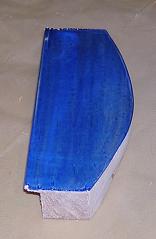
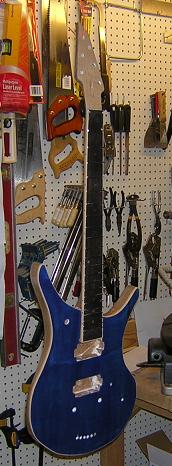
The back of the guitar was going to be left the natural mahogany color. The maple front, however, was going to be transparent blue. I purchased a bottle of blue dye from Stewart MacDonald that could be mixed with either water or alchohol to be used like a stain, or could be mixed with finish to create a tint coat. Because stain doesn't take real well on maple and probably would be lighter than I wanted, I decided to mix it with finish. Using a piece of scrap (cut off from the body blank) I added color to some finish until I came up with the shade I wanted. I didn't need to use much dye to really get a dark color. In fact, I had to add some finish back into the mix because my first attempt was near opaque!
I noticed when working with the test piece that it was very difficult to get the finish applied evenly enough so that there wasn't terrible streaking. Also, every little bubble left a small "fish eye" of dye that dried as a darker dot. I was going to have to be extra careful when applying the dye to the guitar top.
Before applying the dye, I taped off the sides of the guitar to protect the back side from any runs. Getting the dye off a part of the guitar where it wasn't wanted would take quite a bit of sanding, so I decided to be safe and use tape. I didn't try and tape off the front side of the binding. Instead, I just applied the dye right over the top, then later I will use a scraper to remove the dye from the top of the binding.
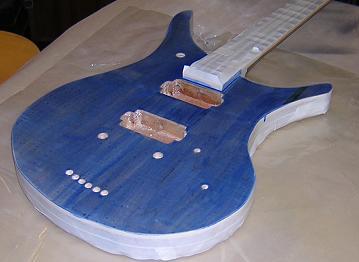
As I discovered when doing the test piece, it was very difficult to get the dye on evenly. I wound up with some light streaks and the little blue dots all over the place. Originally I had planned to just do one coat of colored finish, but after looking at the first coat I decided to apply a second. The picture below is after the first coat.
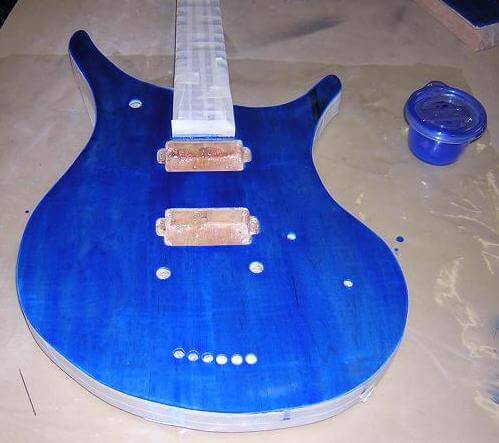
This second coat helped quite a bit, but still wasn't as even as a sprayed finish. Here's where the noticable difference between a sprayed and brushed finish makes itself apparent. If I try doing a brushed finished again in the future, I may attempt to spray the color coat, even if I'm using water based finish. In the end, I think I can live with the result. With the blue color, it actually kind of looks like "denim". Maybe I can just tell people this was intentional? I do like the fact that you can still see the maple grain and figuring through the finish, so at least that part turned out like planned.
Well, after the second coat of color finish dried, I did a little sanding with some 400 grit paper, then decided that a third coat was needed. After the third coat, the color was about right. There were a couple of light spots, but nothing I couldn't live without fixing. Perhaps a fourth coat would have darkened the light spots, but then I would be gambling that the color would be even darker and I would obscure more of the grain than I wanted.
With the color coat dry, I removed the tape and scraped the top of the binding clean. I discovered that it was tricky getting a clean line at the edge of the finish, as the finish had a tendency to peel. I found that by running an X-acto knife along the place where the binding joins the body allowed me to scrape the finish off and give a fairly clean break. The only trick to this was scribing an accurate line. Let's just say if I ever lose my day job, I'm not going to keep food on the table being a pinstriper!
With the color coat ready, I pretty much followed the instructions that came with the Stew-Mac varnish. I applied two coats three hours apart, scuff sanding with 320 grit between the two, then let it dry overnight. The next day I scuff sanded again, then applied three coats approximately three hours apiece (no sanding between), then again let it dry overnight. The third day of finishing was a repeat of the 2nd: scuff sand, three coats with no sanding, then let it dry.
Suddenly, near catastrophe! I had just put the last coat of the third day's finish on and was cleaning up some things in the shop. Out of the corner of my eye I saw movement, then heard a loud crash. The string holding the guitar from the ceiling had broken through and the guitar came straight down on the concrete floor of my shop. My heart skipped a beat and I believe I screamed something, but I really can't remember (hopefully it wasn't profane!) I just stood there dumbfounded looking at the spot where the guitar used to hang. After a moment I got up the courage to go over and survey the damage, and to my surprise (and relief!) there wasn't any visible damage. Not even a scratch. A little bit of sawdust, but that's it. I guess now I'm glad I used epoxy to join the neck! I made a new guitar suspension system by bending an old coat hanger and hanging that from the ceiling. This method was much more sturdy.
Interestingly enough, exactly a week later I was in Dayton, OH visiting a grand opening to a Willis Music store, and I managed to knock a high-dollar Fender Telecaster off the wall. Not sure how I managed it, but the gutiar fell about six feet and didn't fare as well as mine. The bottom of the guitar by the output jack was pretty messed up, with a quarter sized hole through which wood was visible. I thought I was going to have to go home and explain to my wife why I bought a Tele, but the guy at Willis was really cool about the whole thing. So I have to give them props; if you're ever in Dayton (actually Centerville on the south side) check out Willis music. But I digress...
Note that after this point, the pictures of the finishing process are pretty sparse. This is due to a combination of the fact that: A. there's really not much to take pictures of when finishing, and B. My wife had the digital camera packed away before and after we went to visit her family, and I was just too darn lazy to go dig it out.
Once the base coats were on, the Stew-Mac instructions said to give the guitar a complete level-sanding with 800 grit paper. I didn't have any 800 grit, so I used 600 grit and was extra careful to not sand through, especially around corners. I also dipped the sandpaper in water to help keep it from clogging up, and because for some reason I really enjoy the feel that wet sandpaper gives when sanding. Color me a social deviant, but I do.
After the level sanding was complete, it was time for two final coats of finish, three hours apart. I took my time and tried to get the coats as even, bubbleless and run-free as possible, which can be a trick with the water-based finishes. One trick I figured out years ago, was after applying the coat I take a straight pin and pop as many bubbles as I can. This really helps smooth out the coat, but it is a bit tedious.
Finally, the finish coats were all applied. The next step would be to sand/buff the finish to a high gloss, but the finish has to cure first. As luck(?) would have it, I applied the final coats of finish right before I left for a couple of weeks to visit my in-laws. This worked out well, as I was out of the house so I wouldn't be tempted to start the process early. When I returned, the finish was cured enough to continue on.
After I got back from a wonderful family visit, I was ready to hit the shop! Two weeks of being shop-less makes Tundra Man a dull boy. It was time to wrap this project up!
The goal in the finish sanding and buffing is to take the final coats which are somewhat shiny and may have a run or two (or other surface anomalies) and create a smooth, mirror-like finish. I have had some previous experience wet-sanding/buffing paint from doing some amateur auto-body work, so this wasn't completely unfamiliar territory to me. The first time you go through this process, it really makes you worry that you're messing up big time, because the more you sand the worse things look. Like medical procedures and solving Rubik's cubes, things have to get worse before they get better. The sanding process levels the finish and removes all imperfections, then when you finally rub out the finish, you see the shine return.
So off I went, with 600 grit sandpaper in one hand and a cup of water in the other. I'd dip the sandpaper into the water, then sand a section. Occasionally wiping off the residue with a rag helps you gauge your progress. A minute or two after wiping the section dry, the last of the moisture will flash off and the surface will become very cloudy. At this point, it's easy to see how you're doing with the sanding. The goal is to sand enough to remove the high-spots, but not so much as to burn through the finish and expose the wood. The first sanding with 600 grit takes the longest, because you're doing a bulk of the surface leveling with this grit.
I accidentally rubbed through the finish in a small spot on the guitar's top (of course) right above one of the string ferrules. I didn't go through to wood, but I did remove enough of the color coats to make it noticably lighter in that spot. I immediately stopped sanding, even though the surrounding area wasn't quite as smooth as I'd wanted. More on this later.
When I was finished with the 600 grit, I progressively moved through 1000, 1500 and 2000 grit sandpaper. These sandings went a lot faster, because the surface was level and all that had to be done was removing the scratches left from the previous grit. When finished, the guitar surface felt like glass; silky smooth. It looked terrible, however, cloudy and white like a piece of plexiglass that had been attacked with Comet and a scouring pad. Not to panic, as I mentioned above, this is normal.
With the sanding completed, I switched to rubbing compound. This is the part of the finishing process that is the most work, but probably delivers the most noticable differences. I put a bit of rubbing compound on a soft cloth, then rubbed out a small section, with firm pressure. You can literally see the shine appearing as you rub. The goal now was to make the shine of each section equal. This takes quite a while to rub down a whole guitar by hand (which is why the pro shops have a machine buffer) and you have to take a few breaks because your fingers will get pretty tired. But the results are astounding. This cloudy, ugly mess transforms into a wood mirror.
Rubbing out the finish all went well, except for the top. I had mentioned above that there was one spot where the finish had gotten thin around the string ferrels, so I had stopped sanding a little sooner than normal. When rubbing out the finish on the top, I started running into some bad cracking/peeling problems. I started to see little cracks running from around the ferrel holes, bridge holes, pickup cavities and the worst was around the tone knob hole. When the first cracks started to appear, I just attempted to avoid this spot and polish the area around the crack. The more I rubbed, though, the more the cracks started to appear. At one point a large piece chipped off from around the tone knob hole and I had to glue it back in place with some CA! Arrrrgh (how many times have I said this in this project?)

So, my solution to try and salvage the finish was to stop rubbing out the top. I had rubbed most of it, just not to quite as high a gloss as I'd wanted. It felt like glass, but it just wasn't the "mirror" I'd hoped it would be. I decided that for my first instrument, it was good enough. I'm still not 100% sure what caused the finish to start cracking and lifting like that, but I'm suspecting that when I wet sanded, moisture got in between the finish and the wood and cause the finish to fail. That would explain why all of the cracks originate at a hole drilled in the top. I'm also suspecting that an oil-based finish wouldn't be quite as susceptible to water breakdown, if that is indeed what caused this issue. Thankfully, a majority of the cracking would be covered by hardware.
Finally, to give the finish a little added protection, I gave everything a good coat of paste wax and did a final buffing.
After that, it was just a matter of cleaning up the bits of rubbing compound/wax that built up in the holes, and cleaning the slurry residue that seeped under gaps in the tape covering the fretboard. I did the initial cleaning, then discovered that I would keep finding residue of the polishing compound appearing in nicks and crooks all over, especially around the frets. It took several weeks until I stopped noticing these!
Another thing that I noticed was that the clear finish gave the wood a slightly dull, milky look. It's hard to explain, but I believe it's a tendency of water based finishes. Back when I first started woodworking, I strictly used water based poly for it's ease of cleanup and near odorless application. After doing several projects with water based poly, the projects had this same dull, lifeless, slightly milky (others call it gray) tinge. The figuring in the maple didn't pop very well, and the color of the mahogany isn't the normal warm color one associates with this wood. Overall, I'm not very happy with the water based finish, and (never say never) this will be my last project of any type that uses it. Stinky or not, I've decided I'm a water based fan.
So my first guitar finish was done. Not everything I'd hoped for, but not terrible. Ironically, the back of the guitar turned out much better than the front!
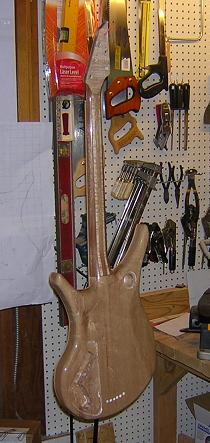
With the finish applied, now it's time to add the hardware, electronics and string it up!
Not sure about how you arrived on this page? You can go back to the fretwork page to see what happened to get us here!
Return To The Main Music Gallery
This page last updated on 06/28/2018