


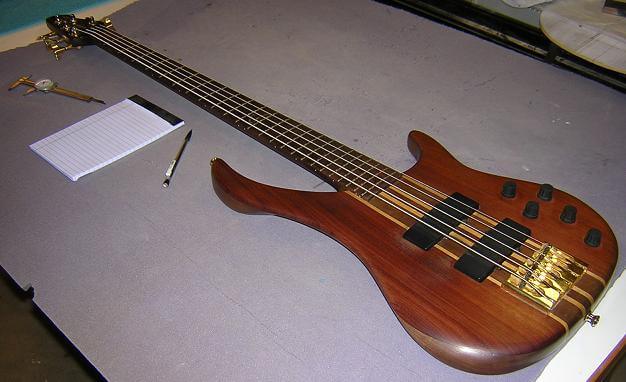
As I mentioned on the main page for Phil's bass, he knew exactly how he wanted his new bass to play. His main bass is a Peavey Cirrus, which he says plays like no other bass he's tried. Well, I'm always up for a challenge so I decided I'd make him a bass that plays even better! Excuse me while I get a shoehorn to help my head through the doorway...
Phil wanted the neck on his new instrument to be identical to his Peavey, so he was kind enough to loan me his bass for a weekend so I could measure it up. I measured the scale length, nut width, 12th fret width, neck thickness at various points, string action height and string spacing. Using these measurements, I should be able to duplicate much of how his current bass feels.
Often times on instruments I'll start with the body. With a neck-through, however, the neck has to be the first item on the agenda as this becomes the foundation to which everything else is attached. So, I needed to get my neck materials together.
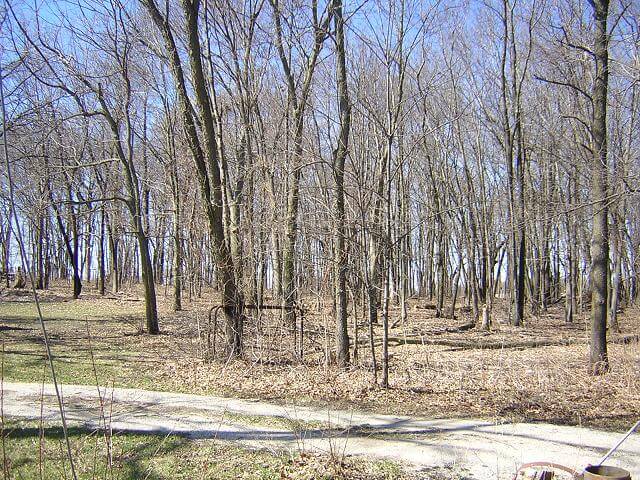
The wood for Phil's bass has an interesting history. My grandfather has some land north of Cedar Rapids, Iowa. A portion of this land is heavy timber. At some point in time (my uncle can't remember exactly when) at least 30-40 years ago the timber was getting quite thick so they harvested many of the trees to thin out the forest. Here's a picture of part of the forest (this is right before the spring budding started, so it looks pretty bare right now.)
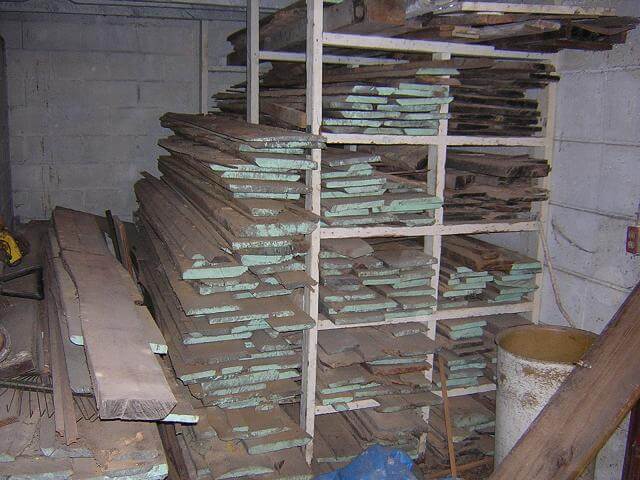
My grandfather had the wood sliced into boards, then stacked and stickered them in the shop for his plumbing/heating/electrical business. The boards hadn't been touched in this whole time (at least by humans; several racoons called them home!) My grandfather's health is failing him, and our family is working on cleaning out some of the "treasures" (sometimes a very loose term) that my grandfather and uncle had collected over the years. I have been given much of the thousands of board feet of the lumber that is sitting in the shop. This photo is of a stack of walnut, and is just a portion of the wood that was offerred to me.
Every board we pulled off the stack was covered in about 1/2" of dust, dirt and racoon poop. I found a couple of rats staring at me as I sorted through the lumber, so maybe it was rat poop. I didn't take the time to closely analyze it, but I can guarantee that it was a poop of some sort. Hey, my son is still in diapers, so I can accurately recognize poop from 50 yards.
On this particular trip, my brother made the 700 mile round trip with me to help load the lumber and to visit my grandfather. My uncle (on the left) has been the caretaker of my grandfather's land for the last fifteen or so years. You can tell we were working feverously on this Saturday morning!

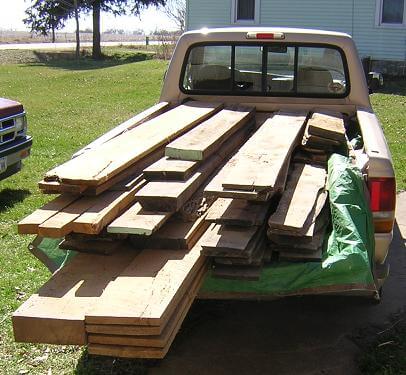
Here's the load of wood in the back of my truck prior to making the journey home. There is approxmately 300 board feet of walnut. On the lower left side, I threw on about 200 board feet of oak that will become a built-in entertainment center if I ever make enough money to finish my basement! This load barely dented the stacks of lumber left in the shop, so I'll be back some day for more.
Once the wood was back home, I started sorting through it to see what I had. I set up some sawhorses in the garage and began selecting pieces.
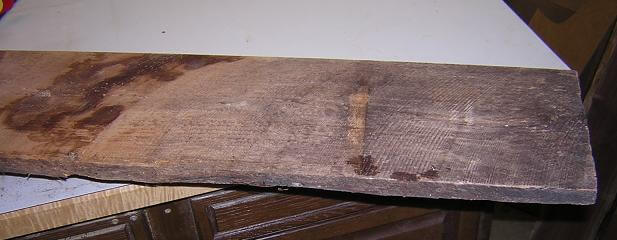
Here's a sample of a board that will become part of the neck. It's hard to believe that a board this nasty looking can be cleaned up enough to be used in a fine instrument, but under that layer of gunk is some beautiful old-growth 40 year air-dried walnut. I think those dark stains are from the racoon poop.
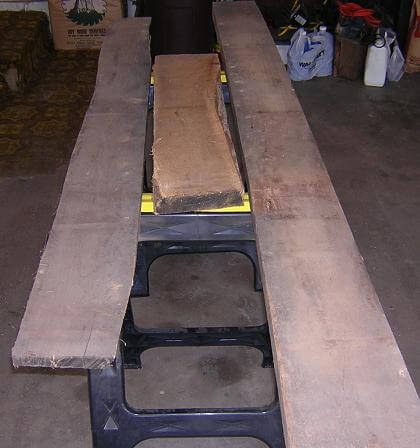
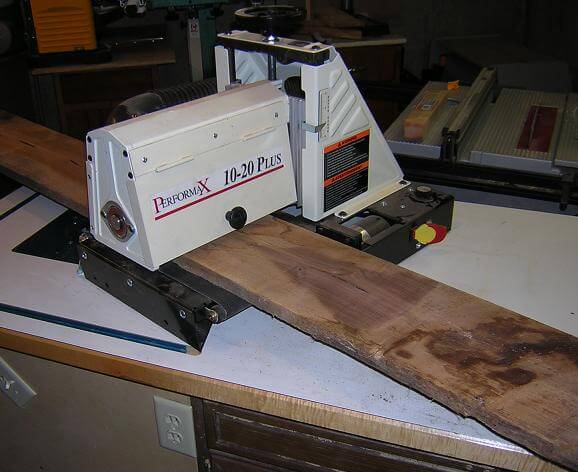
The lumber was all rough sawn, so it needed lots of prep work before it became usable lumber. The dirt, grit (and poop) wreaks havoc with planer blades, so prior to planing it I wanted to remove this gunk. On the smaller pieces I just used my belt sander, but on the longer boards I found my drum sander did a good job (and the dust collection sucked up all the dirt!) Here's a board being run through the drum sander. You can see a portion of the beautiful walnut hiding below the crust.
Cleaning and preparing lumber from rough stock isn't rocket science and frankly isn't that interesting, so I didn't take any more pictures of the process. I had to prepare a few more of the rough boards in order to get enough usable wood for the rest of the guitar.
I still needed to do some more planning work prior to actually beginning any construction. This is a good Saturday morning project. I get up earlier than the rest of my family, but seeing as the shop is right below our bedroom I don't want to wake my wife with the noise from running tools. I don't know this because I'm smart.
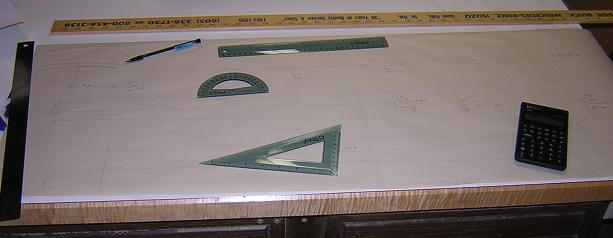
Anyway, I needed to work out the fretboard taper, the neck blank width and the neck angle. I did this by drawing full-size pictures of the bass on a large piece of paper. It's a lot easier to erase and re-draw lines than it is to re-cut lumber, so it's better to spend some time with rulers, protractors and calculators. Plus, did I also mention it's quieter? In the long run, spending Saturday mornings with these types of quiet activities are much kinder to my dental plan.
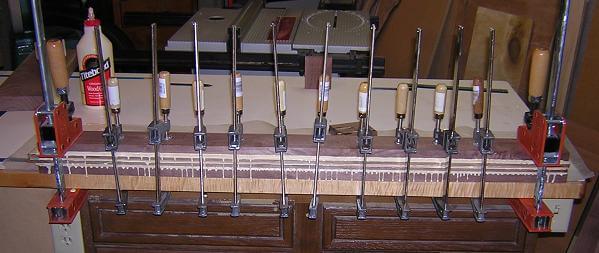
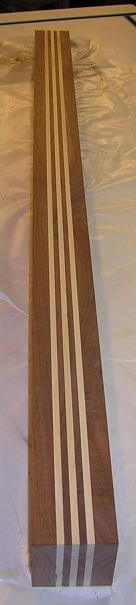
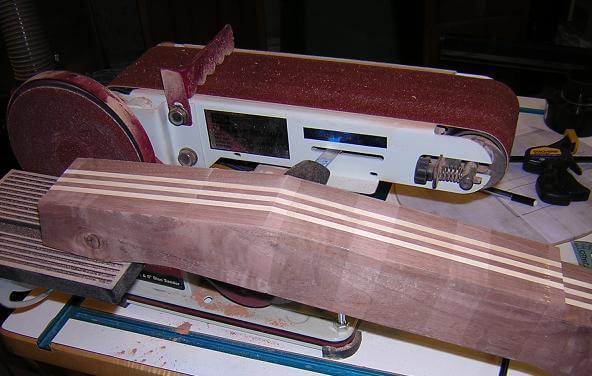
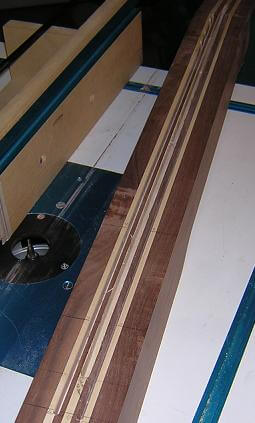
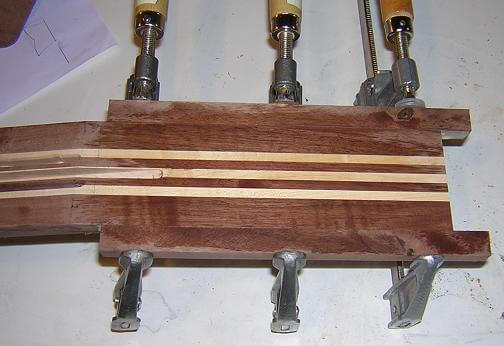
With the planning complete, it was time to start. I cut and planed strips of walnut and maple to size, then glued them up to make a neck blank. Being a neck-through instrument, the blank was 44 inches long. The finished instrument will be about 48 inches long, but to make better use of lumber I'll cut the headstock piece from this blank as well.
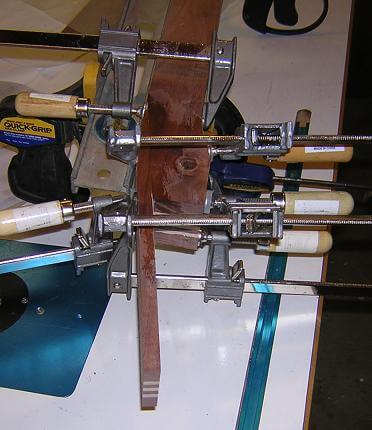
I've learned a couple of tricks when gluing up neck blanks. The first is to use plenty of glue. It's cheap, and I'd rather deal with cleaning up the squeeze-out than to have laminates come apart because they were glue-starved. The second trick is to clamp the neck to the surface of my bench when gluing. This keeps the neck straight as an arrow, which is always a good thing!
After the assembly sat in the clamps for a day, I removed the clamps. Then, I cut the faces and ends flush at the table saw. Finally, I planed the face of the neck flat as this will be where the headstock attaches. We want this part of the instrument as flat as possible!
As mentioned above, to reduce waste I chose to cut the headstock piece from the neck blank. The blank was 2 3/4" thick, so there was plenty of room to remove a headstock-sized blank from the back of the neck area. The headstock piece was 1/2" thick. There will also be a 1/8" face piece glued onto the headstock which will bring the final headstock thickness to 5/8". I didn't get a picture of the face piece, but it's just a 1/8" thick piece of walnut I cut from a piece of scrap.
In order to "tilt" the headstock back (which provides proper downward pressure on the string across the nut, in case you were wondering) we make a 12 degree cut across the end of the neck, the neck blank and the face piece. Then when these pieces are rotated around and glued together, they will created an angle that we can use for the headstock. I clamped the pieces together and cut them at the band saw.
The band saw leaves a very rough cut surface. If I were to glue these pieces together as-is, at best it would leave a very noticable glue line and at worst we would experience a catestrophic failure of the neck. It's best to clean this joint up and make the surfaces perfectly smooth prior to gluing.
There are many methods that people use to achieve this, but the easiest method I've found is to tape the pieces together, then sand the cut faces smooth on a belt sander. By taping them together, this ensures the angle is a perfect match between them.
With the faces smooth, I then used my standard method of gluing a scarf joint. My aluminum level is clamped to the face of the neck. I then apply glue to the joint area and slide the headstock piece into place using the level as a reference. Then more clamps are added to draw the rest of the edges together. The wood looks wet because it's a lot easier to wipe the excess glue away with a wet rag now than it is to try and scrape the hardened drips off later. I'll wait until later to add the walnut face piece.
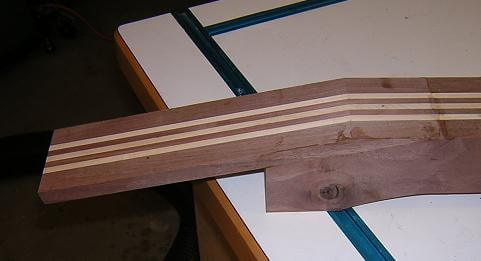
Here's the finished scarf joint. Note the knot in the neck blank below this joint. This will get cut away and discarded later, so it won't cause us any problems.
Next, we need to route a channel for the truss rod. The truss rod will provide adjustability for the amount of neck relief once the strings are brought up to tension. This channel is located in the center of the blank. Because I use dual action "Hot Rod" truss rods, I just have to route a flat channel which is a lot easier than the curved bottom channels that other rods require. I route this channel with the router table.
The channels for the carbon fiber rods are cut in the same way. They are located on either side of the truss rod channel, about 3/16" away. The picture is a little hard to see; sorry about that. "Dangit Jim, I'm a guitar maker not a photagrapher!" The carbon fiber rods will add a great of rigidity to the neck, helping it stay straighter, hold up over time and also make the instrument sound more "alive" by eliminating dead spots on the neck.
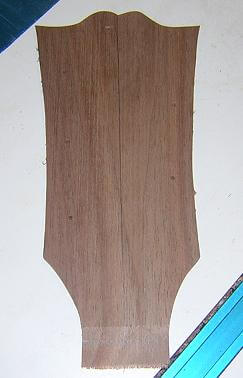
We're not quite at the point yet where we need it, but I took some time drawing up a couple headstock shapes. I let Phillip review them and select his favorite. He chose a large flared version that to me has sort of a 1930's Jazz box look to it (ala D'Angelico). The angle of the photo somewhat hides the fact that the headstock flares out nearly 1/4" from the bottom to the top on each side. I copied that drawing, glued it to a piece of 1/4" hardboard, then cut it out to make a template.
I just realized it's been a while since I made one of my signature "quips," so here goes:
A man gives his son an electric bass for his 15th birthday, along with a coupon for four bass lessons. When the son returns from his first lesson, the father asks, "So, what did you learn?"
"Well, I learned the first five notes on the E string."
Next week, after the second lesson, the father again asks about the progress, and the son replies, "This time I learned the first five notes on the A string."
One week later, the son comes home far later than expected. So the father asks: "Hey, what happened in today's lesson?"
"Dad, I'm sorry I couldn't make it to my lesson; I had a gig!"
It's just a joke folks... kind of like my dancing ability.
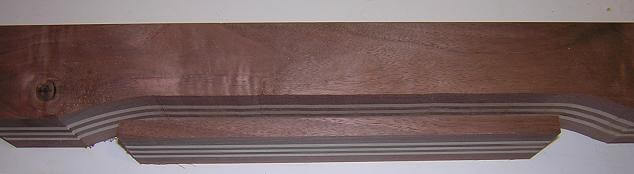
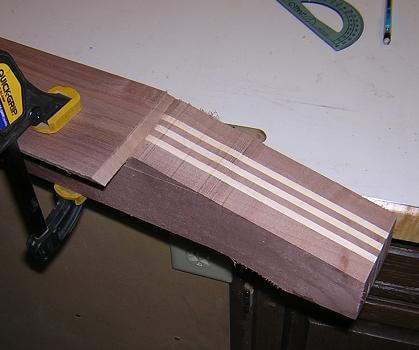
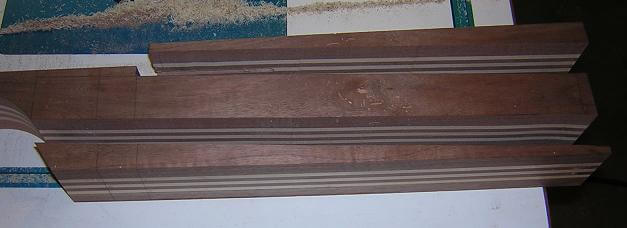
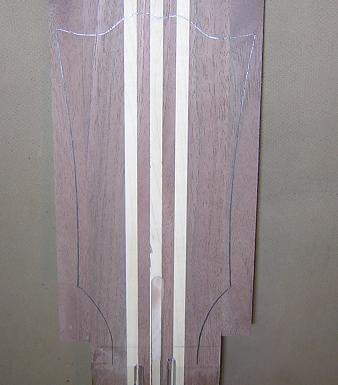
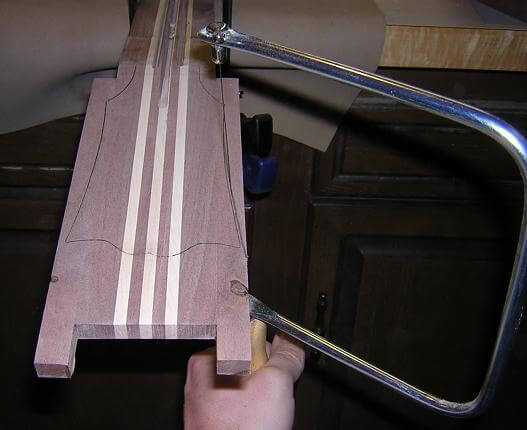
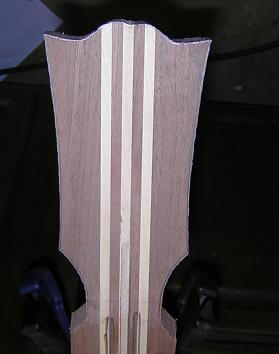
Anyway, back to business. It was time to cut out the side profile (thickness) of the neck. I carefully marked the blank and using the band saw, cut away the rear part of the neck. This will form the basis for the neck thickness. Because the specs on Phil's neck are rather thin, I'll have to be careful when carving so as not to accidentally expose the truss rod or carbon fiber strips. On a neck-through instrument, this will really ruin your day as the neck carving is among the last things to be done on the instrument. If either cavity is exposed, there' nothing you can really do to fix it, and the whole instrument will have to be scrapped. In fact, just making sure the truss rod isn't exposed is not enough guarantee. If too much wood is taken away, the rod can break through once the neck is put under tension. If by chance this happens on this instrument, the muffled explosion you hear in the distance will be me.

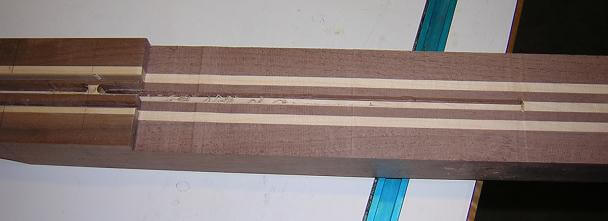
One of the big challenges with neck-through instruments is acheiving the proper neck angle. On this instrument, the neck angle will be about two degrees. This angle is marked on the body side of the neck blank, then cut out on the band saw. The body area is made just slightly too thick, so that when the body wings are glue in place the neck blank can be sanded down flush. This picture explains the situation better than I can describe it:
When building instruments, it always pays to think far ahead on how to best accomplish the different steps. For instance, when the electronics are eventually added (after the bass is finished) a wire will have to be run from one pickup cavity to the other. Trying to figure out how to pull this off after the instrument is done would be a major challenge. So, I took a minute now to route a channel across the front of the neck blank for this wire. This channel will be covered by the top later on in the assembly process.
Usually when I do a headstock with a face plate, I'll just glue the plate to the neck blank and cut out the shape in both pieces at the same time. Because this headstock was going to be bound, however, I had to take a different approach. I marked and cut out the headstock face plate prior to gluing it to the neck blank. To account for the binding, I cut the piece 3mm smaller in all directions.
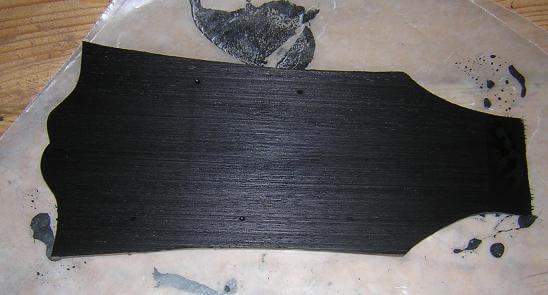
I took a few minutes and did something "out of sequence" just to see what it would look like. The headstock and body faces of this bass will be solid black. I wanted to try dying the pieces to acheive kind of an "ebonized" look. I went ahead and dyed the headstock face black as an experiment. Most of this coloring will get sanded off prior to finishing the instrument, but it would give me a good idea.
There are two methods of attaching binding: the first, used primarily on instrument bodies, is to rout a channel the width and depth of the binding and glue the binding into this channel. The second method is used most often on headstock plates and fretboards, where the binding is glued to the edge of the piece, leveled, then the whole piece is glued onto the top of another piece. The latter is the method I'm using to bind this headstock.
As I've learned, binding a headstock is a major pain and is probably the reason you don't see it done very often. There are lots of strange mitered angles to work out, and trying to cut the angles correctly while keeping five strips of binding plastic in place is a challenge to say the least. I didn't take any photos in the middle of the process, as I was too busy resisting the urge to punch myself in the face. Why would I have this urge? Because compared to binding a headstock it's a much more pleasureable experience. My wife has learned to leave the room when she sees a certain expression on my face, and during this process she considered leaving the house!
Here's a picture after all of the binding has been attached. It hasn't been scraped level yet, so the miters don't look as clean as they will when we're done.
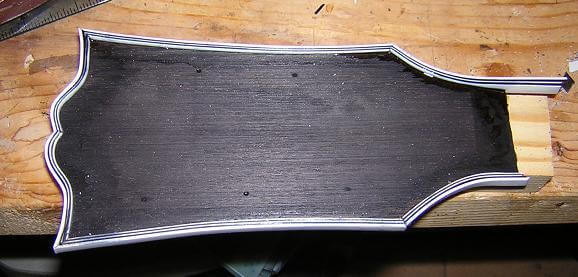
And here's where I scraped the bindings level with the front and back of the headstock face plate using a card scraper. This is a messy process, but it's kind of cool seeing these striped shavings of binding fall to the bench, floor, shoes etc. It also fills the air with a slight aroma of burning plastic. And the card scraper tends to give you microscopic paper cuts that you can't see but remind you of their existence every time you bend your hands. Yet, this process is infinitely more enjoyable than gluing binding to a headstock!
Now on to a more pleasureable endeavor. The headstock will be wider than the neck blank. To provide enough wood to attach the headstock, "ears" are glued onto the headstock area. we don't want to do this until we've completed all operations requiring a straight neck blank edge.
The bound headstock plate is held in place over the neck blank, then the outline is traced. This will be used as a guide for rough-cutting the headstock.
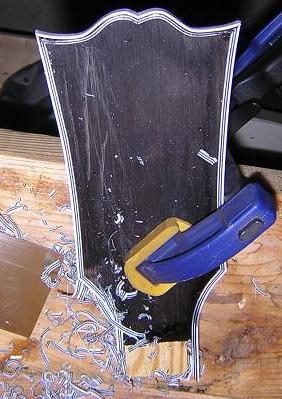
On a regular instrument, I'll cut out the headstock on the scroll saw. With a neck-through bass, however, trying to wrestle the four-foot long piece on a saw and still make accurate cuts would be tricky. So, in this case it was easier to bring the saw to the workpiece. Rather than some fancy power tool, I just cut out the headstock using my coping saw. I stayed about 1/16" outside of my marked line, as I will trim the headstock flush after the face plate is glued in place.
Here's the headstock after I completed the rough cut. It looks better without my fat hand in the way.
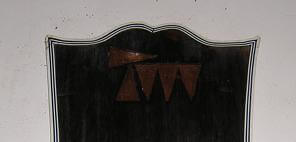
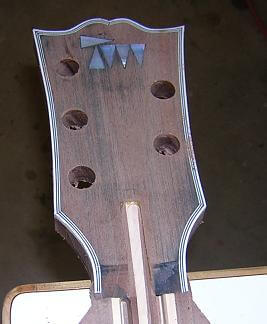
Often times I'll attach my logo to the headstock using a decal on the truss rod cover. With a black headstock, however, a black decal wouldn't be very noticable. (Hey! I'm finally putting my kindergarten education to use!) I decided to do something different, and inlay the logo using mother-of-pearl. The pieces were cut out of pearl using a jeweler's saw. Then they were laid in place on the headstock, and lines were scribed around them. From there, I used a dremel tool to remove the wood at the proper depth and allow the inlay pieces to fit into the headstock like a puzzle.
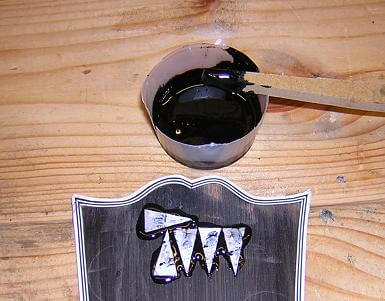
After tweaking the size and fit of the pieces, I glued them in place using black epoxy. It looks pretty bad at this point, but it always does. My uncle used to say, "it's always darkest before the dawn." He burned his retinas out staring at an eclipse.
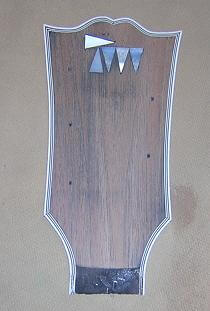
After the epoxy had cured (24 hours) I sanded the inlay flush with the rest of the headstock face plate. This also removed the black dye (I knew it was going to) but it made the inlays look much, much better. This pearl will really look good once the headstock is black and finished.
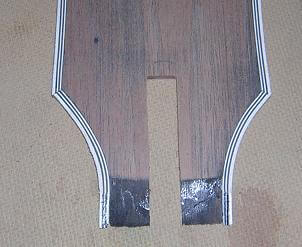
One last thing to take care of prior to gluing the headstock plate in place, is to cut out an area that will allow a wrench to have access to the truss rod cavity. I did this on the scroll saw.
Now I could glue the headstock face plate to the neck blank. I like to use a lot of clamps to make sure things are held tight.

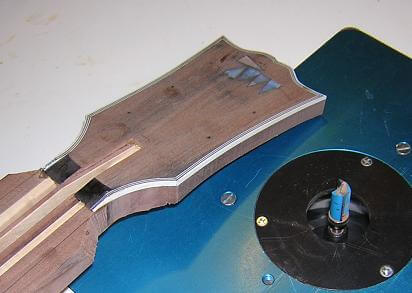
After the glue had dried, I used a flush-cut bit on the router table to trim the lower part of the headstock flush with the bound face plate. I've got the headstock flipped right-side-up at this point, but the routing was actually done face down.
Now the holes for the tuning pegs could be drilled.
The neck's not yet done, but I usually work on different parts of the instrument concurrently. You can continue on here and see what progress has been made with the fretboard.
Return To The Main Music Gallery
This page last updated on 06/28/2018