


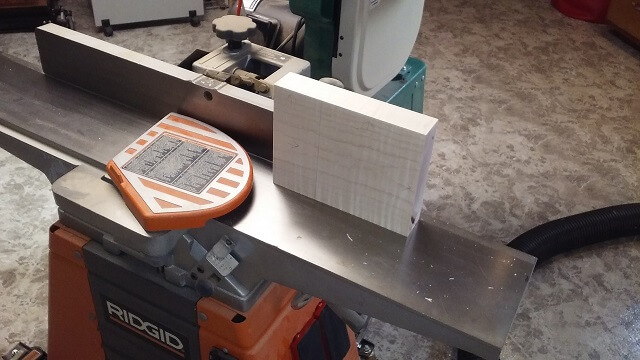
To begin, I had to select a board. This board would make up the majority of the "featured" wood in the guitar. From this board I planned to extract the front and rear faces of the body, along with the majority of the neck wood.
This wood had to come from a specific pile in my garage that contained the remaining boards hewn from the walnut tree on the old family farm. This particular pile is stored on a shelf above my northern-most garage door. There were only about six boards left (roughly 24 board feet including waste wood.) Because of the limited remaining supply of this wood, it didn't take long to select one. The top board on the pile was the thickest at 5/4 dimension (1.25" before surfacing.) That was thicker than I needed, so I pulled out the 4/4 board underneath of it. A brief visual assessment told me that this board would do.
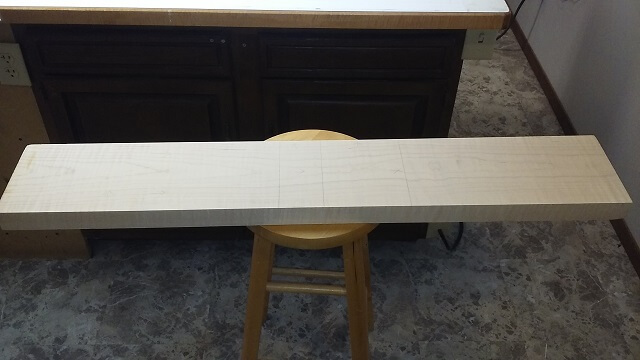
Rough-sawn lumber looks, well, rough. As I carried the eight foot long board inside to my workshop I had to pass through the kitchen where my wife was standing. She saw this long, ugly board entering the room and exclaimed, "what in the world is that?" I explained that it was the wood for Doug's guitar, and she responded with skepticism that anything useful could be made from it.
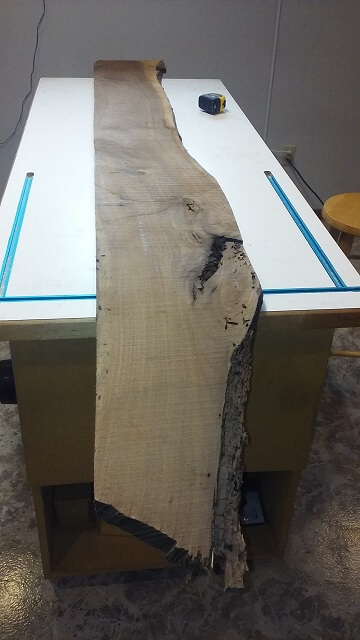
Indeed, for those who have never worked with rough-sawn lumber they would be surprised at how worthless it looks at the start of a project. In addition to the saw marks left by the sawmill blade, this particular board had cracks, stains, knots, bark, sapwood and a big section that looked like the tree had been attacked by insects. Add onto all of this a thick layer of dirt from sitting in a dusty garage while air drying for a decade or more, and this board wasn't much to look at. Here's a picture of the board after I carried it downstairs to my shop, and proceeded to have a sneezing fit from the dust.
Yes, it wasn't yet very pretty. I wasn't worried though. Like a sculpter looks at a rock and sees a beautiful statue, I look at an ugly board and see a guitar.
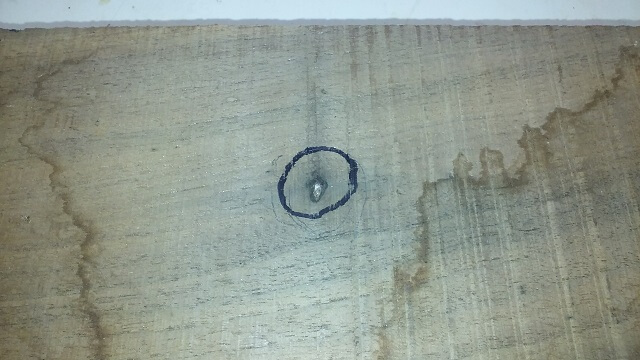
Before I started slicing this board up I gave it a once over. It's a good thing I did, because I found the remnants of a steel spike embedded in it. I'm guessing at some point in time there was a clothesline or something similar hung on the tree, and this piece of metal had broken off and been absorbed by the tree as it grew. It appeared that the sawmill had sawn through a portion of it, which I bet caused a great deal of cursing when it dulled the saw blades. I didn't want to repeat that situation with my own saw blades, so I took a marker and circled the area to make it very clear I should avoid this section while sawing. To make things more difficult, the metal wasn't protruding on the other side so it would have been invisible had I not inspected both sides of the board. I circled the area on the back side as well just to be safe. I then double-checked the remainder of the board for any other metal "surprises" lurking in the wood. Some woodworkers own a metal detector for this very purpose. I don't have one (yet?) so I just had to rely on my eye and prayer.
The first step in working with rough-sawn lumber is to surface at least three sides of the board (commonly referred to as S3S.) We want the front and back smooth and parallel, and one edge jointed perfectly straight. Lumber bought at the hardware store is S4S with both edges jointed straight, along with the two ends cut perfectly square. This is done mostly for sales purposes, as people like seeing a nice smooth crisp-edged board when picking one out for purchase. For my needs with this project, I only needed to get the board to S3S.
I could have milled the entire large board to S3S as one big piece, but this would have caused me a few different issues. First, I had that chunk of metal looming in the middle of the thing. Second, because there were some bad spots that I needed to remove at various points of the edges, if I would have surfaced the entire board at once I would have put more wood in the scrap bucket. Finally, it's kind of a pain wrestling an 8 foot board around the shop when I didn't have any pieces that needed to be that long.
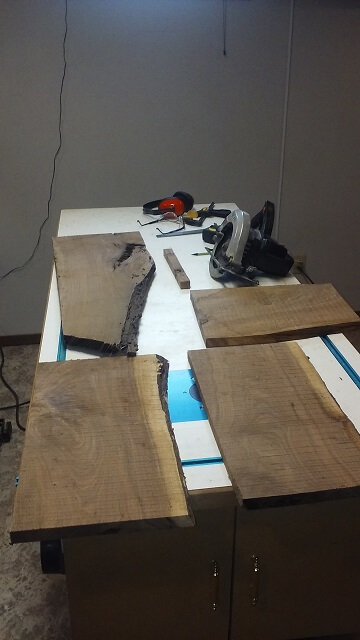
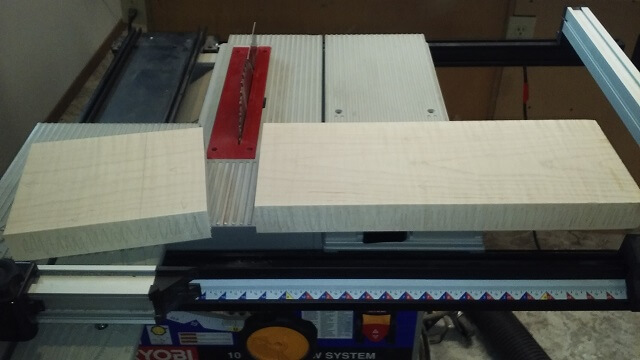
So, having a rough idea of the sizes of S3S boards I would need, I began by cutting the board into more manageable sizes with my circular saw. I had two boards approximately 20" long for the front and back pieces, and another about 30" long for the neck. There was an extra piece about 15" long that wouldn't be needed for this project, but I figured while I was at it I'd go ahead and get that piece to S3S and place it on my wood storage shelf so it's ready for a future project. If you look closely at this picture you can also see the 1.5" piece I cut that contained the chunk of metal. Immediately after I snapped this picture I threw that piece in the wastebasket.
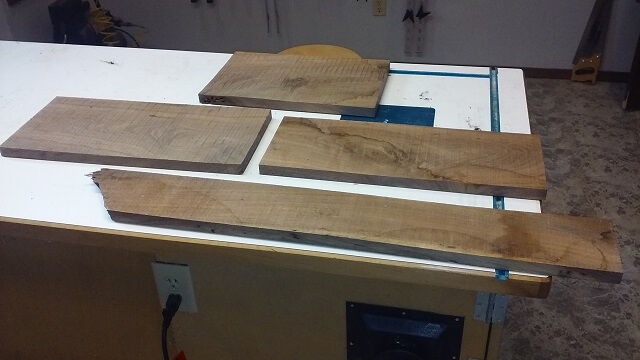
The next step was to cut off the areas of unusable wood along the edges. I did this at the table saw. While the board edges aren't yet squared at this point, the wood is slowly beginning to look more usable.
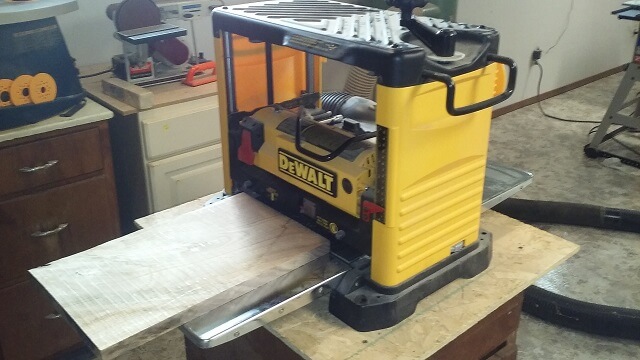
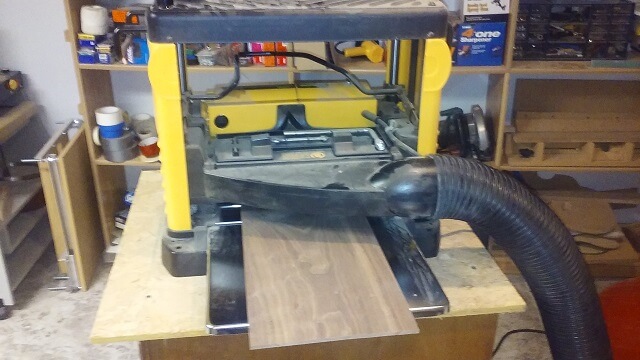
Now it was time to plane the fronts and backs of the boards smooth and parallel. This is done using my planer (which as an added point of interest is unquestionablly the loudest tool in my shop.) The planer cuts a face of a board so that it it parallel with the opposite face. This doesn't mean that the board is perfectly flat after coming out of the planer, just that it is a uniform thickness when measured at every point. A wavy board will still be a wavy board, just evenly wavy. Thankfully these boards were pretty flat to begin with, so I didn't have to take an extra step beforehand to flatten one surface before planing the opposite surface to be parallel.
I ran the boards through very slowly, only taking off a fraction of wood with each pass. I do this for a few different reasons. First, it allows me to only remove enough wood to smooth out the surface and minimize waste. Second, it makes my planer blades last a lot longer to not be digging deep and grinding out a bunch of wood at once. Third, I greatly reduced the chances of "tear out." Tear out is when there are areas of grain that change direction, and the blade grabs these spots of grain and literally tears out pieces of wood.
After a few dozen light passes on both sides I had the boards smooth and exactly .75" thick. With the sawmill marks removed now the beauty of the walnut was starting to peek through.
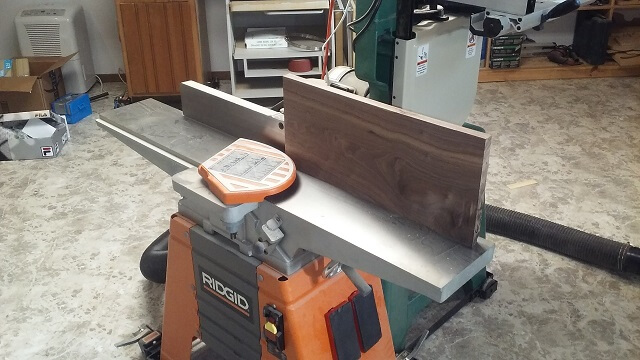
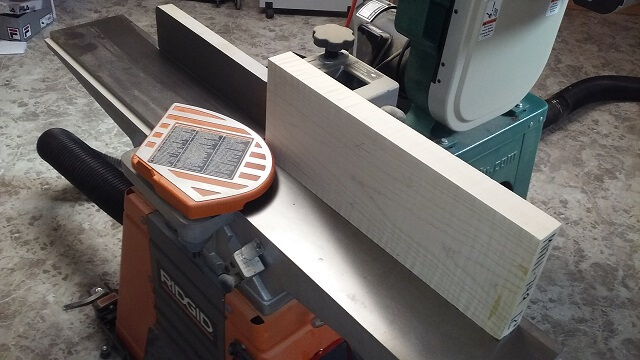
Once planing was done, the boards could be considered S2S (surfaced two sides.) Next up was to take care of the 3rd side, which is milling one edge perfectly straight. This straight edge can be used as a reference point for the next steps. The jointer is the tool used to flatten this edge. Similar to planing, I have my jointer set to remove just a hair of wood with each pass. I ran the boards through 4-5 times each until they all had a flat edge.
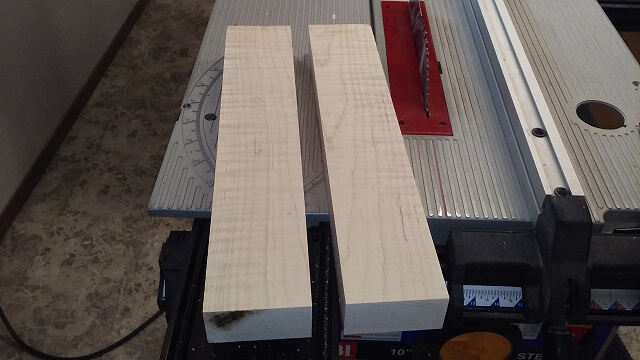
The front and back of the instrument will feature the walnut. To help enhance the visual appeal of the wood I "bookmatched" both pieces. Bookmatching is a technique where a board is cut in half across its thickness, then opened up like a book and glued back together. You then wind up with a board twice as wide as the original, but only half as thick. However, what remains is a board that is close to symmetrical down the center line and is very pleasing to the eye. So I used the band saw to cut the two boards for the front and back down the center. This is called "resawing".
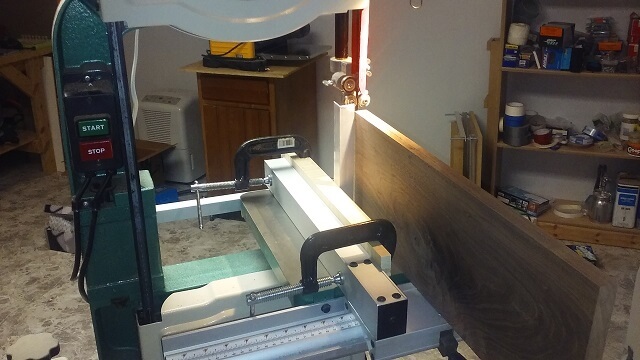
The band saw doesn't leave a very smooth cut. Plus, as much as I try to center the blade on the wood there are slight differences and minor blade wanderings that make the two cut sides not exactly the same thickness. So after resawing at the band saw I always follow up with planing the sawed faces smooth. By running the boards through the planer at the same time I could also guarantee that the two sides of each bookmatch are also the exact same thickness.
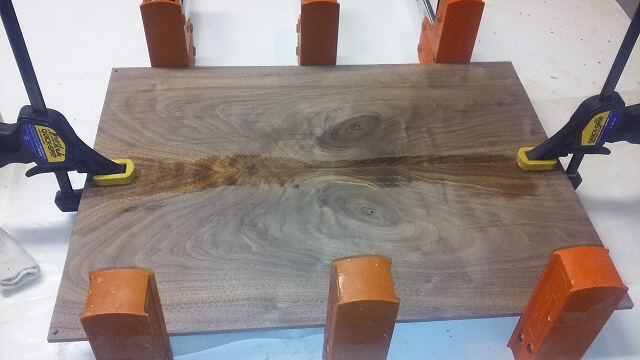
Now it was time to glue the bookmatched pieces together. I started with the pieces that would become the back. No special reason, just because I had to start with one or the other, and the back pieces happened to be on top of the stack.
I chose this piece to be the back because of a couple knots in the wood. These knots were structurally sound, not having any loose areas that may fall out or weaken the piece. Now traditionally, a board like this wouldn't be used on a guitar hanging in your typical musical big-box store. The big manufacturers would throw this piece in the burn barrel and select pieces they consider "defect free."
I approach my guitars with a slightly different mindset. I often like to use pieces with what other builders would consider "defects." To me, a tree is like a person. We all have defects and flaws that coexist with our beautiful parts. They are part of what makes us who we are. Similarly a tree has beautiful areas, and other spots that aren't as beautiful but are no less part of the same tree. So I like to feature them both. To me it makes my guitars feel "real." I like a spotlessly pretty piece of wood as much as the next guy, but sometimes they are so perfect they almost feel sterile. To me, wood with some imperfections and stress areas seems to tell a story, like the tree is saying "remember that wind storm in 1933 when I lost that big limb which left me with this scar?"
You may not agree with me, which is fine. You may prefer the "perfect 10" woods used by (insert your favorite luthier here), which again is fine. We all have different tastes and preferences and one is not better than the other. They're just different. My wife likes radishes, and I like cucumbers. While our tastes in salad differ, neither one is wrong.
Anyway, I'm not sure how I got distracted. Back to building this guitar. I ran some glue down the perfectly straight jointed edge and clamped the two sides of the back piece together. The dark spot down the middle is where I used a wet rag to remove the excess glue squeezing out from the joint. It's a lot easier to remove this glue before it hardens when it then would have to be sanded off.
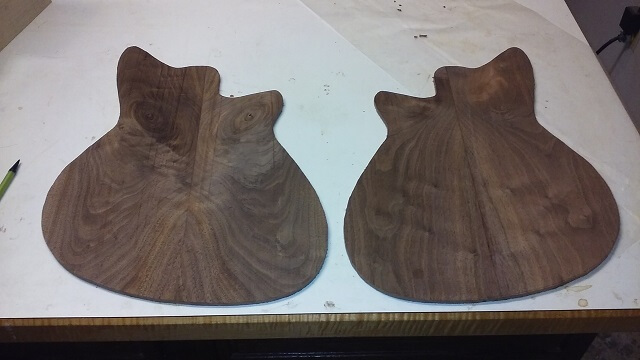
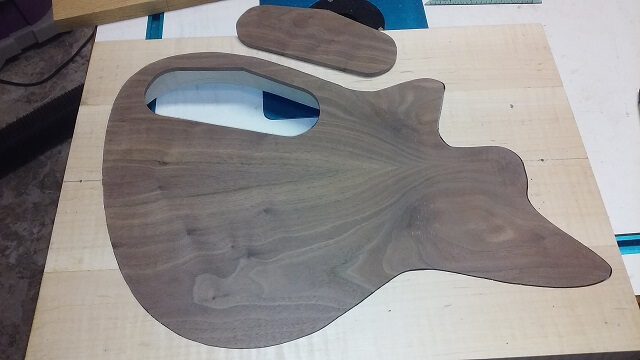
After a couple of hours I removed the back piece from the clamps and repeated the process with the two front pieces. I picked these pieces to be the front because it appeared to have a little more figuring in the grain (called chatoyance) and you usually want your "money side" to be on the front of the instrument.
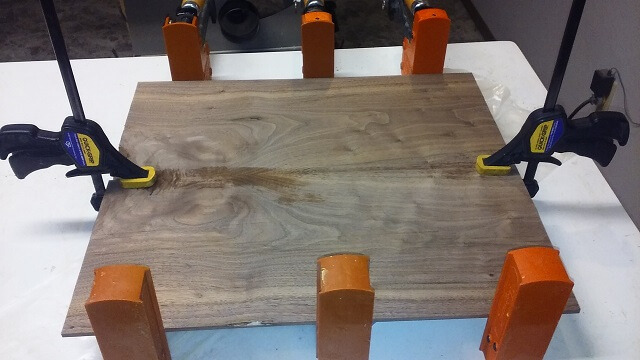
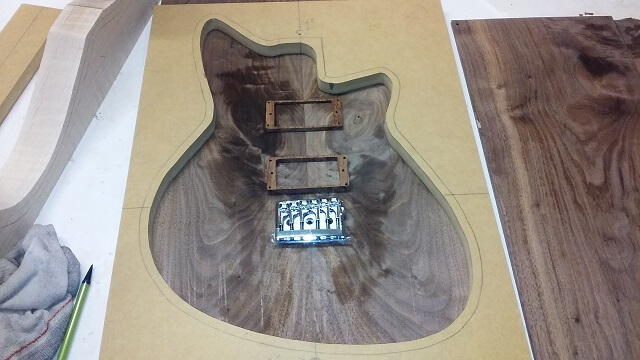
After the glue had dried I removed the front and back pieces from the clamps and gave them a good look. Then I set my template on top of them and started roughing in where the hardware would go just to help me visualize things. I wiped both of the boards down with naptha to give a better idea of how they would look under a finish.
I know I had originally chosen the piece with the knots to be the back and the "defect" free piece to be the front. That's what would make sense, right? I mean any guitar builder would tell you that's what you should do. This is guitar design 101.
I sat there for at least 1/2 an hour going back and forth between the two pieces of wood, laying the template out on both and staring. And then I made a gutsy decision: the piece with the knots would now be the front of the guitar. It still seems crazy as I type it, but it's almost as if that piece of wood was screaming at me that it belongs on the front of the guitar. Despite everything my brain was telling me, I went with my heart. I had to admit the piece with knots had way more character. The idea behind this guitar is to feature the walnut tree from the farm, and doggone-it, sometimes life on the farm is tough. Apparently this tree wants to wear its battle scars with pride.
Likewise, if the old back was now the new front, the old front now has to become the new back. It's not a bad looking piece of wood by any account. It just doesn't have the same personality that the other piece displays.
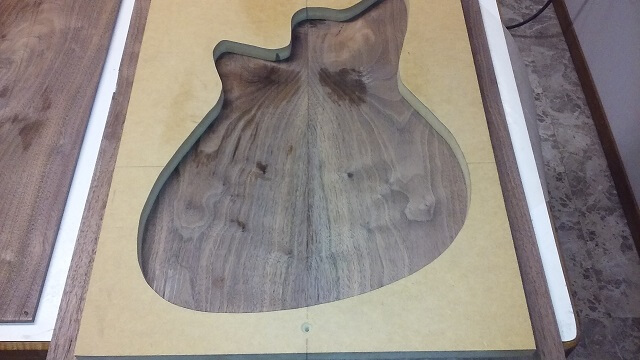
So I took the pieces of wood and cut them out at the band saw, which pretty much burned the bridge in regard to changing my mind about which piece is the front and which is the back. These pieces need to be exactly the right size in order to fit inside the template perfectly, so this first cut at the bandsaw was just about 1/16" outside of my marked line.
Now to get the pieces perfect, I used double sided tape to attach my template piece and trimmed them flush at the router table. I use double-sided carpet tape very often. If they ever stop making it I'm in trouble.
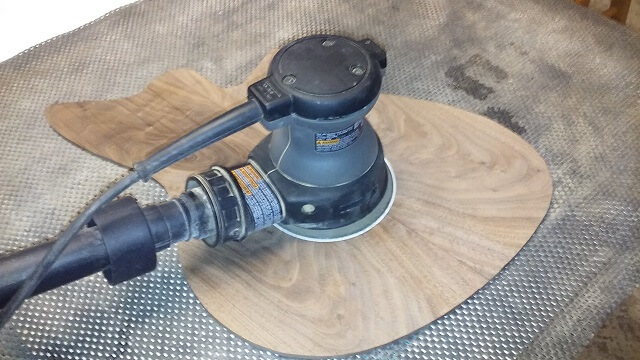
With the pieces now cut to exact size, I took a couple minutes and sanded them smooth. They weren't too bad to begin with, but there was some sanding scratches left from the drum sander and a little bit of unevenness from when I glued them together (measured in micro-inches; it's near impossible to glue pieces exactly perfect.) That hose sticking out of the side of the sander leads to my shop-vac and keeps most of the sanding dust under control.
Now that the front and back pieces had progressed to a good stopping point, my focus shifted to the maple "frame" that would hold them in place.
Most successful projects start with a plan. In this case, I've used this guitar design previously so a lot of the planning was done. Many of the nuances of this particular instrument had been mulled over in my head for quite a while prior to starting. However, in this case I wanted to sketch things out to help me use my wood as efficiently as possible. I really hate throwing wood in the trash.
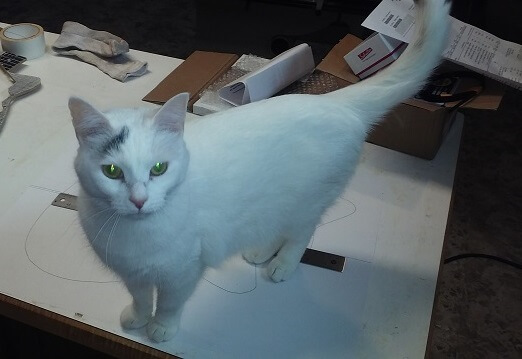
I spent some time drawing out my plan and figuring out my wood layout. It seems that I gave so much of my focus to the guitar that I was neglecting our cat Spot. She jumped up on the workbench and voiced her displeasure that I was building a guitar instead of petting her. So I took a short break to give her some attention.
The maple started as one board, about 48" long, 7.25" wide and 1.75" thick. When I purchased it, it had already been planed to the exact thickness I wanted so I didn't have to worry about that step, which was nice. It was a perfectly clear piece with no knots (which apparently wouldn't have stopped me with this project) a nice curl, and unfortunately a price that reflected its quality. The lighting in this particular picture doesn't do the curl justice, but you'll see in later pictures the beautiful figure.

I began by marking out my cut lines. From the plans I'd drawn up earlier, I calculated that I only needed 28.5" of this board to build the body. So there was a good portion of it that could be returned to the wood pile for use on another project. The remainder probably wasn't quite big enough for a guitar project, but could be useful for something.
Eventually, I will want four pieces of maple to make up the frame of the body. But first, it was easier to start with two pieces. One was about 19" long and one was about 9" long.
I needed to establish one good, straight reference edge on both of these pieces, so I ran them both through the jointer giving me a perfectly flat side. I also made sure I penciled in notes on the pieces as I cut and jointed them so that I could keep the orientation straight as the pieces get smaller. It can be difficult to visually see which side of a piece was jointed and which wasn't so my marks were important to keep it all organized.
With one side of each of those pieces jointed I could run that straight edge along the fence of my table saw and cut the pieces to proper width. The two outide pieces only needed to be 3.5" wide, which was accomplished by splitting the long piece in half. The two inside pieces (which right now were still a single piece) needed to be 7" wide.
Because these pieces were going to get glued together, I wanted the glue faces to be perfectly straight and smooth. So after I cut the pieces to width at the table saw, I ran the sides through the jointer to remove the saw marks.
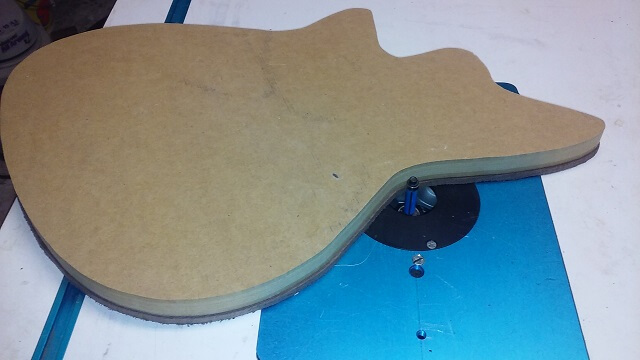
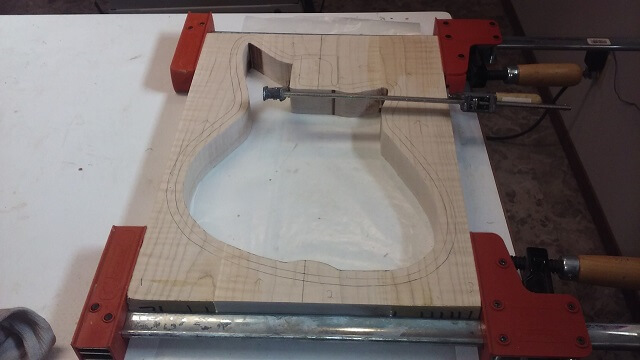
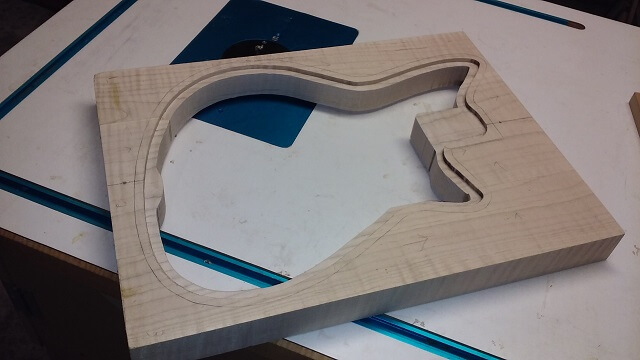
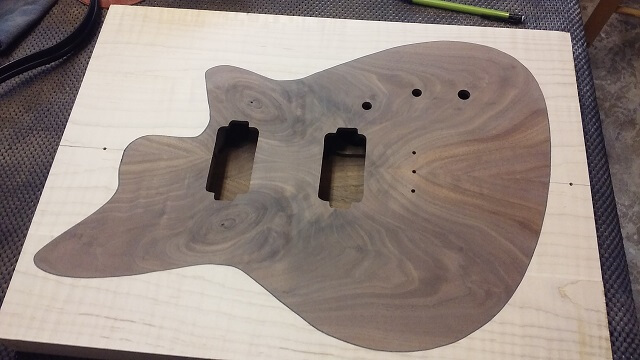
This picture should better explain what I'm doing. I dry-clamped the pieces together and marked out all of my lines. The outer line is obviously the outline of the instrument. The middle line is where the edge of the inlaid walnut top will sit. The inside line is where the inner part of the hollow body will get cut.
I could have just glued a bunch of wood together and been done with it, but that would have resulted in a lot of waste. When dealing with fancy wood such as this (or any wood, for that matter) it breaks my heart to just throw it in the scrap bin when I could have been more efficient. So you can see the large open space in the middle that no longer contains waste wood. As a side note, this picture also gives a better idea of the beautiful curl in the grain of this wood. Some people call this "tiger maple" because the stripes are similar to a tiger's stripes.
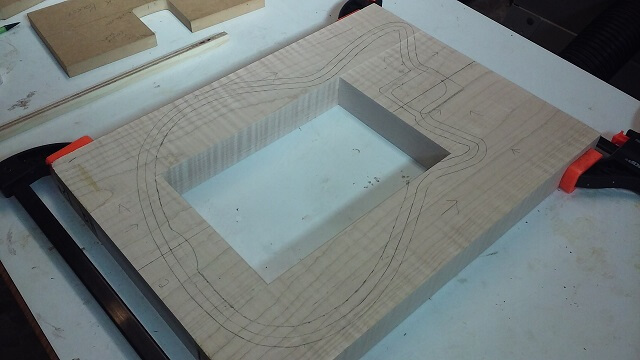
With my pieces marked, it was a lot easier to cut out the waste areas in the center as separate pieces. If I were to glue the four frame pieces together first, I wouldn't have been able to use the bandsaw to make these cuts. Plus, it would have been a lot larger piece to wrestle around versus four smaller pieces. So here I'm cutting out the waste section at the bottom of the frame. That little bump out is there to give the screw for the strap button a little more meat to grab.
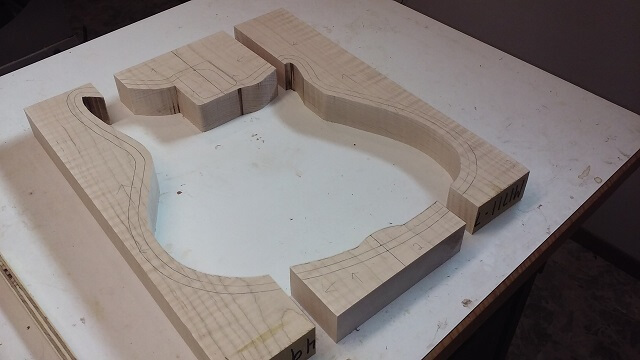
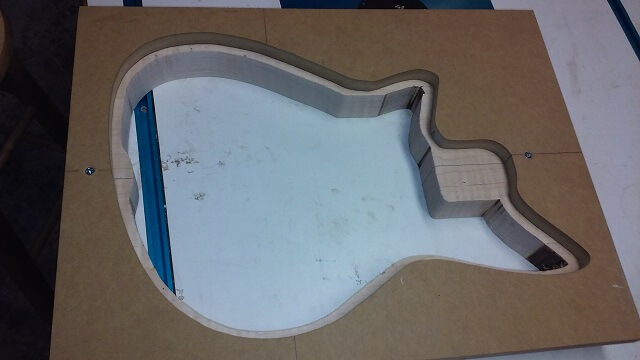
Here are the four frame pieces after trimming out the hollow section and before gluing them together.
Now the frame was glued together. Because the actual length of the glue joints weren't very long, not a lot of clamps were needed.
After the glue had dried, two holes were drilled through the body to match two holes in the template. These holes are located in scrap area. These holes allow the template to be attached in the exact same place on either side of the maple frame. That way I can assure the front and back of the instrument line up visually.
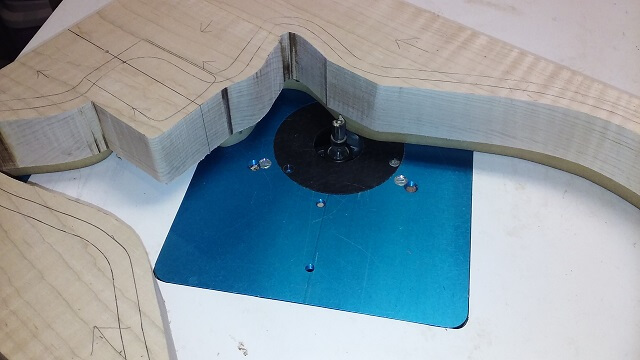
With the template attached I can place the piece template side down on the router table and use a bit to trim the "ledge" that will hold the inlaid top. The height of the bit was set to the height of the template plus the exact height of the walnut front/back pieces. Then it was just a matter of routing around the edge of the maple until the bit ran along the template all the way around. I went slow and only took a little bit off with each pass to avoid chipping out the maple.
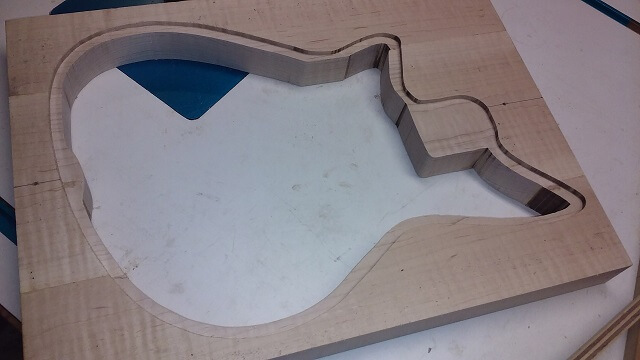
Here is the back of the instrument after routing was complete and the template was removed. I've noticed this particular piece of maple seems to be unusually prone to burning. Every cut I made with every tool had a little bit of burning. I speculate that the same thing that causes the beautiful curl in the wood is the same thing that causes the wood to want to burn. The good news is, all of the burned areas (so far) occur in places that won't be visible once the faces are glued in place.
And then I screwed the template into the other side of the frame and routed the ledge for the front.
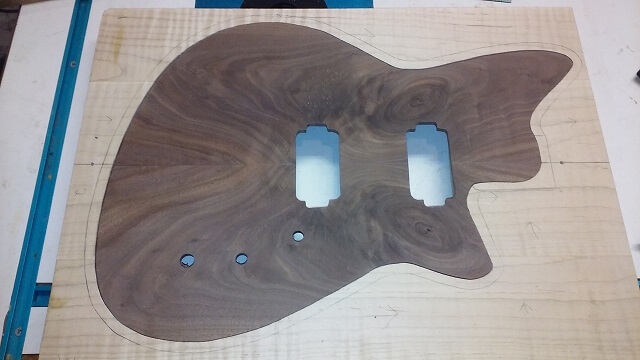
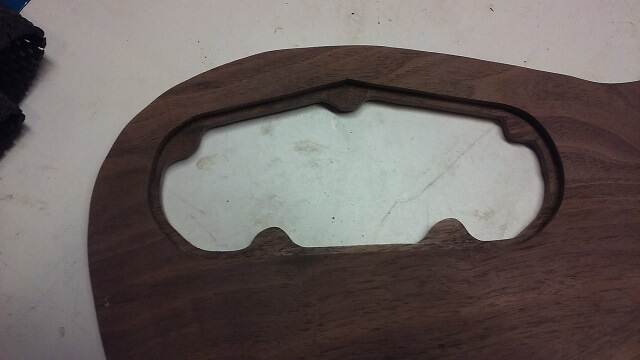
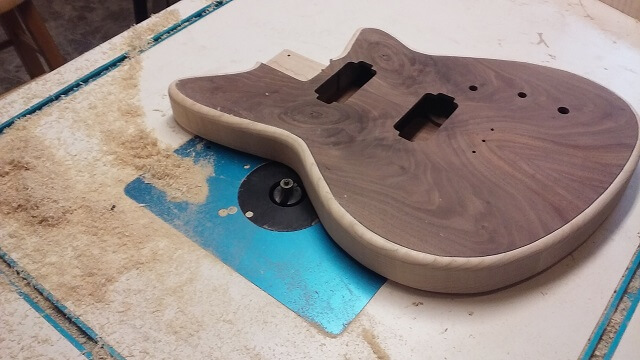
I wanted to do a bit more prep work before I could glue the front and back pieces into the frame. I cut the holes for the pickups and drilled the holes for the controls on the front piece. Doing it now before it's part of the larger piece meant I could use my scroll saw for the pickup holes, versus trying to route them with a template. The scroll saw is a much easier option, especially on thin 25" stock like this top. I set the piece in the body frame (no glue yet) just to take the picture.
Meanwhile, our cat Spot decided she needed to patrol the shop and make sure everything was up to her standards. We got Spot from the animal shelter about 10 months ago. She was a stray. I have no idea how she survived on her own as a stray, as she is the least aggressive cat I've ever seen. Not once has she ever hissed, clawed or bitten us even when she's not happy (like when getting her nails trimmed.) The worse she'll do is put her paw up and try to push your hand away if you're doing something she deems unpleasant.
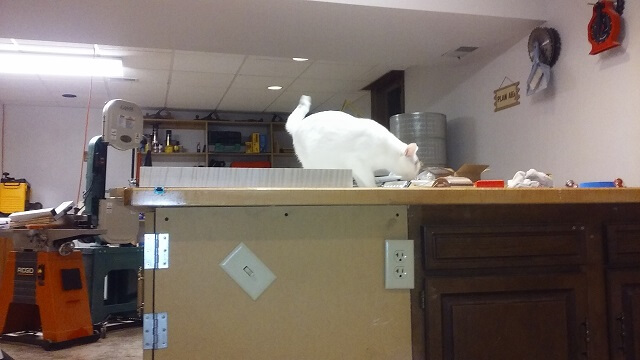
Spot is also unusually social for a cat. She generally wants to be in the same room you are in. When we leave the house she watches us depart from the front window. When we come home she meets us at the door. And sometimes, like she was doing this evening, she decides that she needs extra attention. I succumbed to her demands and sat down on the floor to pet her for a few minutes.

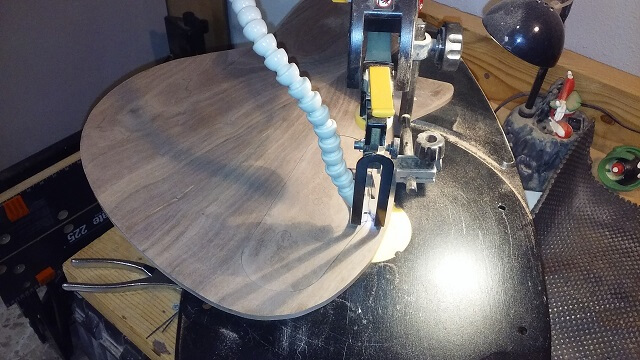
Once Spot's petting needs had been satisfied I returned to work. Next, I wanted to cut a control cavity cover from the back piece. I drew out the cavity shape on the piece, then drilled a 1/16" hole on the line. I passed the scroll saw blade through this hole and then affixed the blade to the saw. The nice thing about scroll saws is they allow you to do "inside cuts" like this, whereas a band saw can't because the blade doesn't separate. Another nice thing about scroll saws is the cut is so smooth it rarely ever needs to be sanded.
I know a lot of luthiers don't utilize scroll saws, but I use mine constantly. In fact, I use mine so much that I've been considering upgrading to a high-end model versus the old budget Ryobi I've been using for the last 15 years. I'll probably keep using the Ryobi until it dies before I upgrade, though. And at the moment it's still running strong so it probably won't happen for quite a while. My Marvin The Martian lamp definitely needs a new head, though.
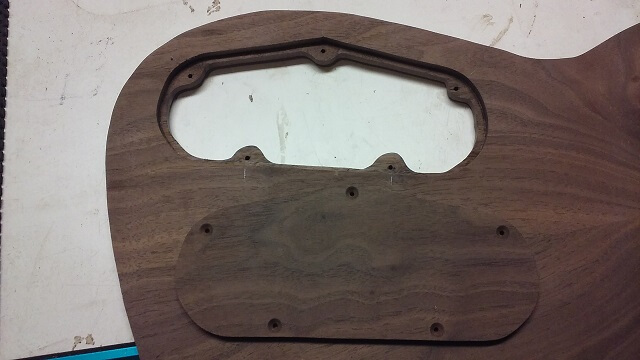
Here's the back piece set into the frame (once again, no glue yet) with the cavity cover sitting nearby. Cutting the cover directly from the back piece allows the grain to match perfectly once the cover is in place. It's one of those nice custom touches my instruments feature that you can't find on a mass produced instrument.
Because the top piece is only about 1/4" thick, that doesn't give the bridge screws much meat into which the threads can dig. (Side note: I really went too far in the previous sentence to avoid ending it with a preposition.) To solve this, I grabbed a chunk of walnut out of my scrap bucket and cut a piece about 2 1/2" by 3/4" by 1 1/4" thick which I then glued to the back of the top in the spot behind the bridge screw holes. This piece was sized at the correct thickness so that it can also be glued to the back once we're farther along in the construction process. While this piece is probably too small to experience much in the way of wood expansion/contraction as the weather changes, I went ahead and made sure to orient the grain so that it matched the top and bottom. I figured it was cheap insurance to avoid any cross-grain interaction however unlikely it may be.
On the other side of the body, I needed to create a "ledge" on which the control cavity cover can sit. I took a scrap piece of the 1/4" walnut I used for the back and drew out a rough sketch of what the piece should look like. Most of it won't be visible so I didn't worry too much about making it pretty and perfect. Similar to the bridge block above, the biggest thing was to orient it so that the grain would run in the same direction as the back once it was glued in place to avoid any expansion/contraction issues. I cut out the center section on my scroll saw. Then I glued the piece in place.

Here's what it looks like from the front side. You can see the ears that stick out farther to give room for the screws.
Then it was just a matter of drilling some holes for screws, and drilling some countersinks in the cover piece.
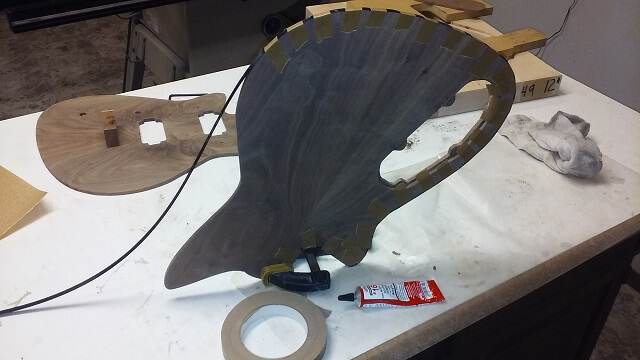
The last step that needed to be done before the walnut top and bottom pieces could be glued into the maple frame was to glue binding to the edges. This binding will give a nice decorative element to the piece, and also serves the purpose of filling in the slight gap between the top/bottom and the frame that was created by the scroll saw kerf.
The ABS plastic binding is attached to the wood using a solvent-based plastic cement called "Weld-On." It's kind of messy stuff if you get it on your hands. To hold the binding in place while the glue dries, I used special paper tape specifically designed for attaching binding. It's a paper tape with a very sticky adhesive, which works well to pull the binding tight against the wood. I slowly worked my way around the body pieces, applying some glue, pressing the binding in place and then taping it to hold it there.
When both the top and bottom pieces had been glued all the way around, I set them aside to let the glue dry.
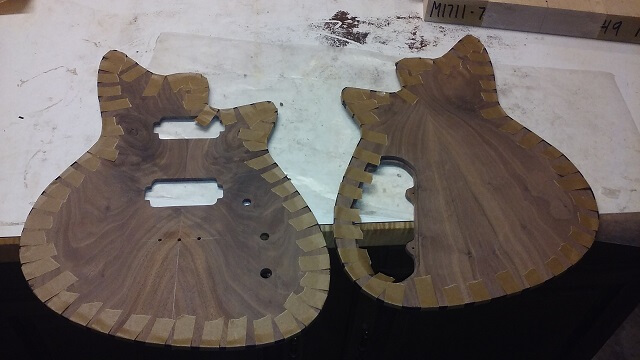
After they dried I peeled all of the tape off, which actually took more time than expected and gave me some sore fingers. That stuff is sticky. I then scraped the binding flush with the wood and also removed any glue squeeze-out that may have occurred. I only did this on the back sides of the pieces, as they needed to be smooth to sit flush inside the maple frame. I'll level the front sides after they are glued in place.
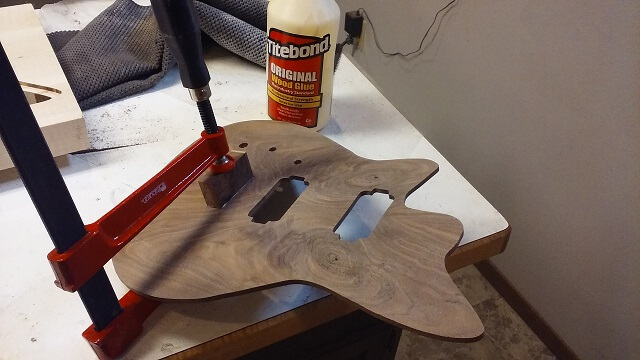
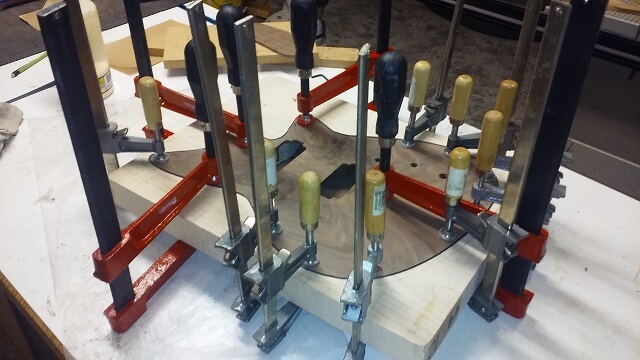
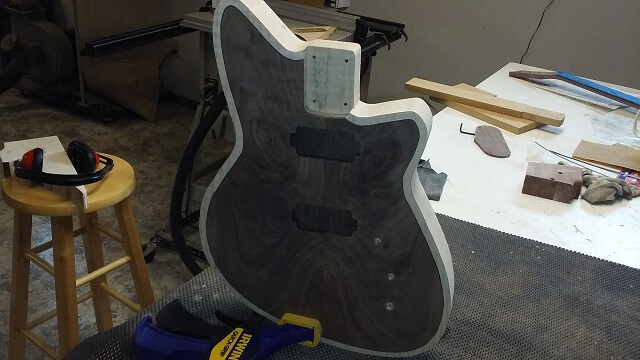
So now it was time to make my three separate body pieces into one. I spread glue all along the ledge of both sides of the maple frame, then set the walnut pieces in place. It was a nice, tight fit. Then I clamped everything down, squeezing the two sides together. In retrospect, I easily could have used twice as many deep throat clamps as I owned. I may have to pick up a few more of those for the next time I build this style guitar.
After the glue had dried and the clamps were removed, the front and back were sanded flush with the metal frame. The sanding removed a little bit of glue squeeze out, leveled the plastic binding and took care of any minor height differences between the walnut and maple.
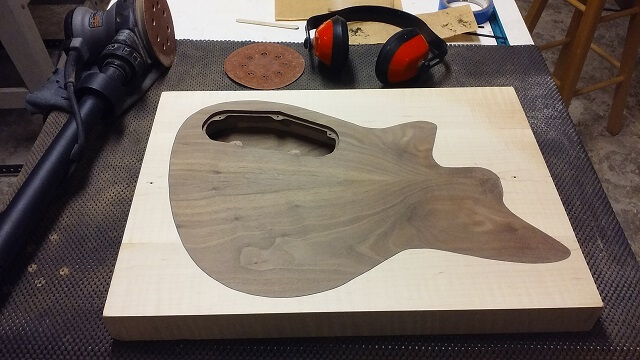
This guitar will be a bolt-on, which means the neck is attached to the body via screws. Now that I type this I realize how inaccurate the term "bolt-on" is. It should be called a screw-on. All these years I've been talking about guitars only to realize that I've been making a fundamental error in regards to hardware terminology. My life has been a lie...
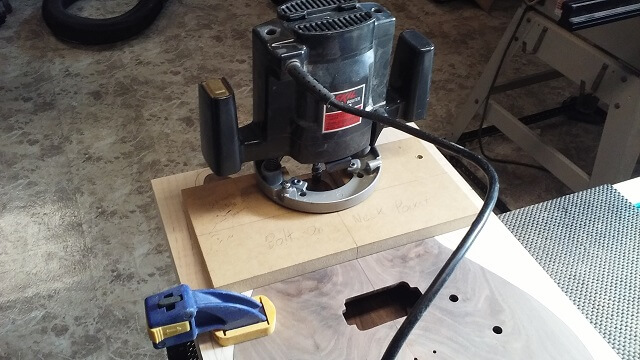
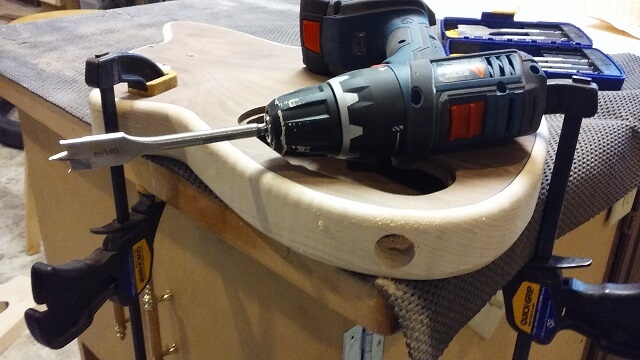
Anyway, I had to route the neck pocket. I started by cutting away a bit of the scrap maple at the top of the guitar so I didn't have to plunge my router bit directly into the wood. Then I attached my routing jig with double sided tape. The tape alone is often enough to keep the router jig in place, but for some reason it seemed to have a little wiggle this time around. So just for my own piece of mind I also drove a couple of screws into the jig. I made sure to locate the screws in scrap spots that would get cut away from the guitar body.
Good news and bad news. The good news is that the routing jig was firmly attached. The bad news is that as I was tightening one of the screws I heard a "pop" and then the screw head rotated freely. Rats. I broke a screw. I decided that as long as the jig was in place I would go ahead and route the neck pocket and then worry about the broken screw afterwards.
So I got out my router and chucked up a flush cutting bit. The final depth of the neck pocket was 5/8". Just to make my bit last longer and reduce the chances of tearing out the wood I only took about 1/8" of depth at a time and made 5 passes before the pocket was fully routed.
After the routing was finished I began dealing with the broken screw. It had broken just below the head, which meant there was about 1/2 of screw still stuck in the jig and about 1 1/2" stuck in the body. This explains why the jig was still held secure after the screw broke. Unfortunately that also meant that the jig couldn't be removed from the body without destroying it. I pried the jig off the broken screw stump, which effectively ended its serviceable life. Bummer. I'd used that jig for a lot of years. Now I'll either have to make another or buy one.
Moving on with life, I drilled the four holes for the neck screws. So while my jig died a premature death, it did so for a noble cause.
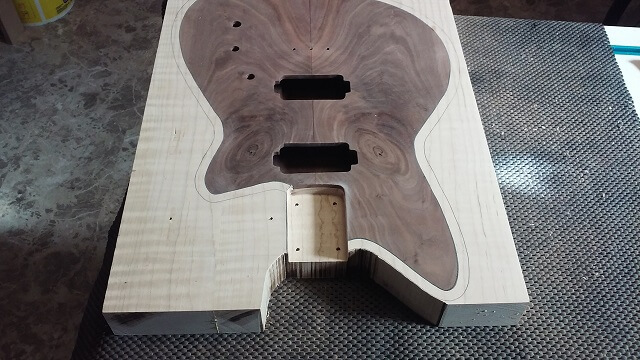
Up to this point the guitar body really didn't look much like a guitar body. It looked more like a bizarre version of something that Bo Diddley would have played. Now it was time to cut the body shape out. I used the band saw and stayed just outside my traced line.
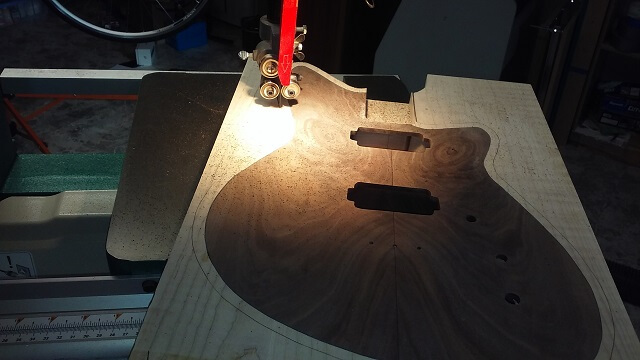
With the body cut to rough size, I did the final shaping over at the oscillating spindle sander. In addition to letting me shape the body all the way up to my traced line, it also removed the terrible band saw scratches and burning that were left from the previous action. I noticed that this piece of maple loved to burn any time a saw blade or a router bit hit it. Maple in general is prone to burning, but something about this particular tree made it even more susceptible.

With the edges sanded smooth, I had one spot in the corner of the cut-away that had a big old burn mark in it, but was too far in to where my round sanding drum on the spindle sander couldn't reach. I spent a few minutes with needle files smoothing that corner and removing the ugly black charred area.
Now I had a nice shaped guitar, but with square edges. Guitars generally don't have square edges because who would want those corners digging into your arms? Even acoustic guitars have a very slight rounded edge. So I chucked up a 3/8" roundover bit in the router table and ran the guitar through on both sides. As usual I made a bunch of passes raising the bit slightly between each. This made life easier on my router and bit, reduced the danger of chip-out and also reduced the amount of sanding I would have to do later to remove the aforementioned burn marks that cutting at full depth would have certainly produced.
The last step of building the body was to drill a few holes. I drilled holes for the strap pins and the output jack. It is important to drill the hole for the output jack after rounding over the body edges and not before. If you drill this hole before you round over the body edges the bearing on the router bit will "fall into" the output jack hole and spoil the body. Thankfully this is one of those rare situations where I didn't have to learn this lesson via experience.
The construction of the body is now finished. Let's move on. Here's where I am building the fretboard.
Return To The Main Music Gallery
This page last updated on 06/28/2018