


Let's get one thing straight right off the bat: I am not a Detroit Lions fan. My blood runs purple, and seeing as the Lions are in the same NFL division as the Vikings, you can guess who I root for when the Lions play. About the only time I root for the Lions are when they're playing the Packers, but don't get me started about Green Bay!
Nevertheless, my brother-in-law is a Detroit fan. When looking to make a Christmas gift for him, I mulled over several different ideas. Remembering the segmented Teddy Bear that I made for my son shortly after he was born, I decided that a segmented wall plaque of a Detroit team would be fitting.
Once again, I realize that what I do is not officially intarsia, but is actually an art form called "segmentation." Generally I use the two terms interchangeably, although I do recognize the difference. For those of you who don't know, true intarsia uses different species of wood for the different pieces, orients the grain of each piece to complement the picture, and does not rely on any artificial wood coloring. Segmentation is a process where the pieces are cut from a single piece of wood, shaped and stained, then glued back together to form a 3D picture. Segmentation gives 90% of the look of intarsia with only 10% of the work. I have a great deal of respect for true intarsia artists, as they have patience I can only dream about.
I began my project by searching the internet for pictures that would be suitable enough as a pattern for a segmented wall plaque. This took longer than I had thought. Most pictures were too simplistic or too intricate to be useful. After many hours, I came across a helmet profile picture that I thought could be used.
I printed out the picture, then went to work with my Lone Ranger Tracing Set to convert the picture into a 2D line drawing to be used as a cutting pattern. Once the pattern was created, I photocopied it (so I'd still have the original in case I screwed up) and used spray adhesive to attach it to a piece of pine.
Next, I began cutting on the scroll saw. I started with the most intricate part of the cutting, which was the Lion emblem on the side of the helmet, so if I messed it up I would be able to start over without having a lot of extra time invested. The inner shape of the lion wasn't too bad to cut out, but the two border pieces were very thin and didn't allow much variance off of the cut line. I did end up breaking one of the border pieces while messing with it after I had cut it out, but thankfully I was able to glue it back together without it being noticeable. After the lion emblem was cut out, I proceeded to cut out the remaining pieces.
Now the real fun of the project began: sanding. All of the pieces still had the paper pattern glued to them, which had to be removed. Most of the pieces needed to have the sharp edges rounded off in order to give them a 3D look. I approached the rounding off process by thinking about how the piece would look in real life. If the piece was flat (i.e. the lion emblem on the side of the helmet) I would leave the edges of the piece crisp. If the piece was round (i.e. the face mask pieces) I would sand off much more of the edge. All this sanding took quite a bit of time. As luck would have it, I had to go out of town for work, so I brought all the pieces with me in a shoe box. I sat in my hotel room staring at the TV and sanding. I'm sure the cleaning staff of the Hampton Inn wondered why my bed was full of sawdust.
After all of the pieces were sanded, then I had to color them. Looking at the original photo, I grouped all of the pieces together by the color I would use. Some of the pieces would receive no color. I pulled out several different colors of stain, and applied the respective stain to each group of pieces.
Once the stain had dried, it was time to glue everything together. This turned out to be somewhat of a puzzle, as I had to figure out what each piece was and (in some cases) which end was up. I used a copy of my pattern to lay out all of the pieces dry and make sure they were in the right spot. I set down a piece of waxed paper on the work bench, then starting with the large helmet piece, I began gluing pieces together. Once all of the pieces were glued, I let the plaque sit for a few hours to dry.
Seeing as the glue surfaces weren't extremely tight, and there was no good way to clamp the piece, I didn't want to rely on the glue between the pieces to be the only thing holding it together. A piece of 1/8" hardboard was cut out slightly smaller than the piece and glued to the back. I also nailed a picture hangar onto this backing so that the finished piece could be hung on the wall.
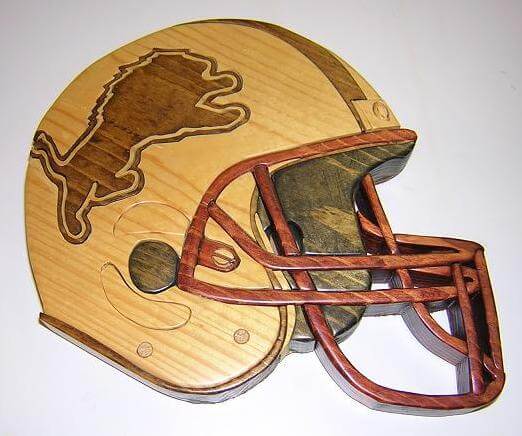
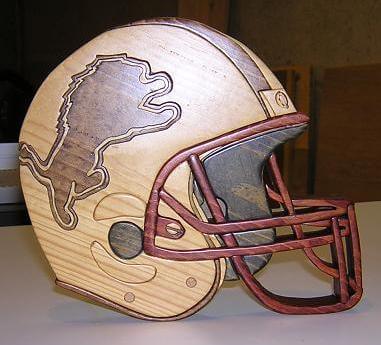
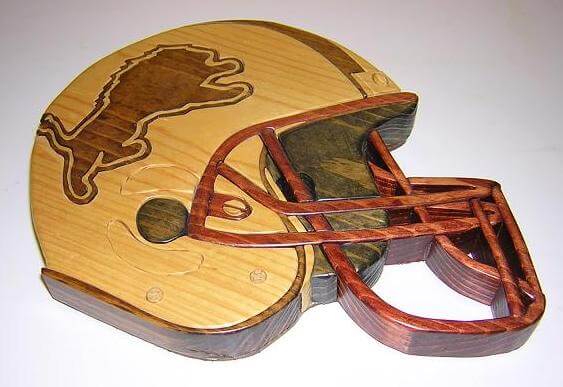
When all the glue was dry, I gave the piece a couple of coats of spray poly. So here it is: the finished Detroit Lions Wall Plaque:
To cover my hiney, I must say that this is not a licensed NFL product. I have not received any compensation (other than self satisfaction) for making this wall plaque. I am not affiliated with the Detroit Lions (whew) or the NFL in any way. I am not planning on making any more of these, and definitely wouldn't try and sell them. Please don't sue me. You're not going to wind up with much if you try, as I have no money.
Return To The Main Wood Gallery
This page last updated on 06/28/2018