


Important Disclaimer! What follows is a description of what I did to my table saw. In no way am I encouraging you to do the same. I am simply relaying information about my own modifications. Modifying the factory safety equipment on any table saw can be a dangerous proposition, and I am not suggesting that you should do it as well. If you mess with your saw's safety equipment and cut your finger off, it's your own fault. If you don't mess with your saw's safety equipment and cut your finger off, it's your own fault. Don't try and sue me. I have no money anyway. If I did, would I have gone through the trouble of coming up with this cheap endeavor in the first place? Plus, doing this will most likely void your warranty and make a mess in your shop.
Sorry. The voices in my head made me write that. Anyway, the factory splitter/pawls/blade guard on the Ryobi BT3100 saw left much to be desired, in my opinion. Yes, it is a better design than that which was on my old Craftsman saw, but still, it always seemed to get in the way and be inconvenient to use. In addition, having to remove it every time I did a through-cut was a pain in the kiester. What I found, was that more and more often I was making the poor choice to just remove the assembly from the saw and run without (hey, it works for Norm Abram, right?)
Since I bought the saw, I had been lusting after one of Lee Styron's Shark Guards (learn more about them at BT3Central), but I couldn't bring myself to shell out the dough when there are so many other fun tools to buy. So I continued on in my bad habits of no safety equipment.
Then, one day I had a spark of an idea. An idea that was like none other I'd ever had. An idea that would change the world! Wait, no that's someone else's life. What I had was yet another one of my hokey plans to save me coin. And thus, the Bat Guard was born!
I got the idea for the name by mixing my affinity for bats with and noticing that the blade guard flies above the table. Hey, if Lee can have the Shark Guard, I can have the Bat Guard, can't I?
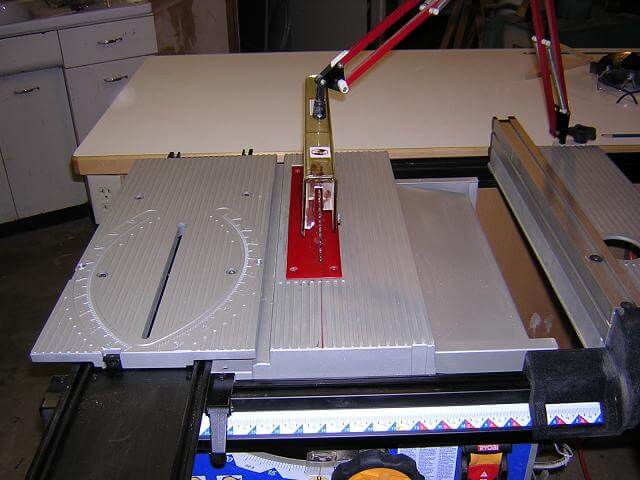
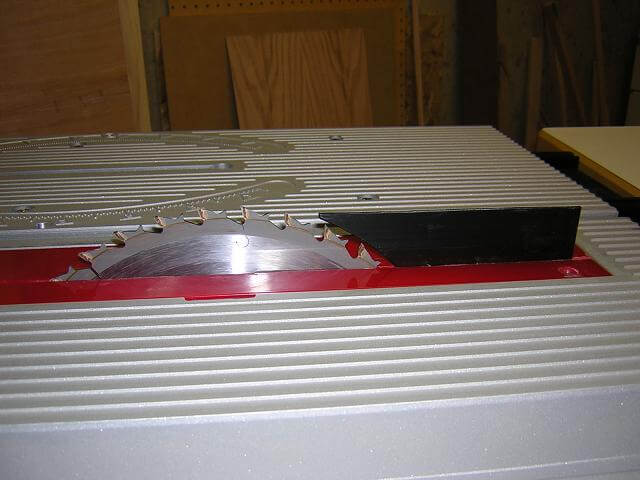
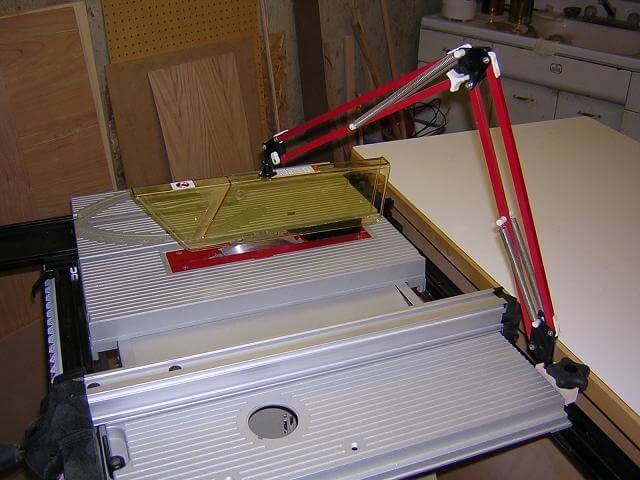
I started by cutting down the stock splitter into more of a riving knife. I pried the push-nuts that held the blade guard off of the top of the splitter and removed it. Then, I installed the splitter and lowered the blade down until about 1 tooth would stick out from the ZCTP. From there, I ran a marker line down the splitter to give me a reference point to cut it off, and removed the splitter. To make the line easier to see, I ran a strip of masking tape along side the line, then went to town with my hacksaw. It took about 5 minutes to cut down the splitter. I filed the edges smooth, and colored the top (where I made the cut) with black magic marker (hey, I'm cheap; but I did splurge and use the Crayola markers). Then I reinstalled the splitter into the saw and adjusted it.
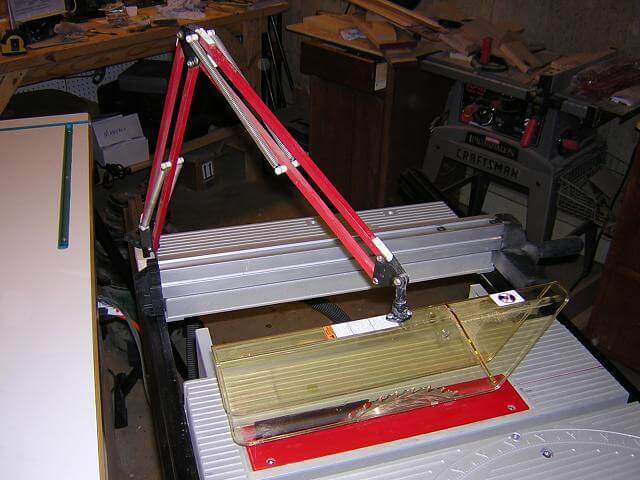
This took care of the kickback reduction, but didn't to much to keep my digits out of sharp spinning objects. I needed to come up with some sort of blade guard solution. I have always been impressed with the over-arm blade guards you see in the tool catalogs, but my shop space and my wallet (remember, I'm cheap) wouldn't allow the purchase of one of those. So, like a good South Dakota boy, I made due with what I had.
I had an old desk lamp that was on it's last legs (6th grade Christmas gift from my father - no joke). The light fixture had fallen off several times and was held on with cheap screws and duct tape. The switch hadn't worked in 20 years, so you had to plug it in when you wanted to turn it on. The clamp had broken years ago, so I was making due with parts from another lamp. But hey, it was still meeting my needs so I've kept it around all this time. Are you starting to get the impression that I'm cheap?
It was time to sacrifice this lamp for the good of all mankind, or at least to beautify my music room, which is where it was located. I removed the light fixture and extracted the cord from the body of the lamp. The old clamp was discarded (well, it's sitting under my router table in case I come up with a use for it.) This left the spring-arm assembly. I took the blade guard and carefully drilled holes in the top to allow me to attach it to the end of the arm.
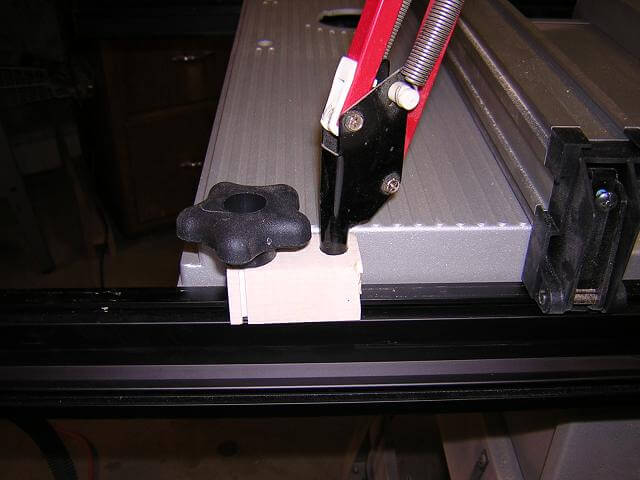
But how do we attach the other end to the saw? T-nuts of course! I took a piece of scrap maple (a chess piece I'd messed up) and drilled two holes. One hole would hold the T-nut to allow me to attach it to the saw rail, and the other hole was big enough to accept the end of the spring-arm.
So there we have it - the Bat Guard. The riving knife gives protection against kick-back. The blade guard is easily positioned for all heights of stock, and I can even tilt it for miter cuts. The arm is high enough to where it doesn't get in my way. I can position the clamp anywhere on the rails to accomodate different cuts, and best of all, I can easily swing it out of the way when I'm setting up the saw.
I'm pretty happy with what I came up with, especially considering I spent no money. Somebody once told me I was cheap. I wonder why they said that?
Return To The Main Wood Gallery
This page last updated on 06/28/2018