


So you have a new Garmin Zumo XT GPS unit for your motorcycle and are all excited to use it to create custom routes exploring all those neat roads you see on the map. Woohoo! Then, if you're like me, you quickly figure out that it's not that easy to do. In fact, it's downright complicated.
You see, GPS units work great when you want to navigate from your current location to a specific address point, and you don't care what route you want to take. That's what the GPS was originally designed to do: figure out the shortest and/or quickest way to get you to the place you want to go. It removes the burden of knowing how to get somewhere, and allows us to let the GPS "brain" tell us when and where to turn. It's great for finding your way to a brand new address where you've never been, and the destination is the only goal.
This works great when driving a car. Unfortunately, oftentimes when riding a motorcycle, we don't want to take the quickest or most direct way to get somewhere. In fact, we usually want to take the slow, off-beaten path on the way to our destination. The destination isn't the goal, the journey to get there is the goal.
Usually we have specific roads in mind that we want to ride, and just want the GPS to assist us as we go down this predetermined route to help make sure we don't miss a turn. Because our GPS units weren't designed with this functionality in mind, it becomes problematic to force them to not make the decisions for us, and instead follow the roads that we have already picked out.
The good news is it's just problematic, not impossible.
That's why I put this page together: I went through a surprisingly steep learning curve and tried a whole bunch of failed methods to create predefined routes for my Garmin Zumo XT before I came up with the following process that works pretty well. Hopefully my pain can save you from the same time and hassle that I had to go through to figure this out.
Unfortunately, there's a lot of steps. Fortunately once you do it a handful of times it gets a lot easier and quicker to create routes.
I will readily admit that the method I use probably isn't the only way to create predefined routes. It's just the best method I've found so far. Maybe in the future I'll find an easier way. Maybe someone else already knows an easier way. I'm certainly not omnipotent, so I'm not going to bask in my hubris and say this is the procedure to end all procedures.
One of the things I like about this procedure is that it uses a separate mapping program. Perhaps you can create routes right on the GPS unit, but I find that really cumbersome. I would much rather sit in my recliner with a laptop and design new routes while I watch a ball game, without having to squint at a tiny screen and try to use a pop-up keyboard to enter text.
Speaking of mapping programs, there are a whole bunch of them out there. In my quest to figure out the least painful method, I tried a lot of them. There were pluses and minuses to most of those I tried, but obviously there was enough of an issue that I abandoned that tool and moved on. Here are some of the ones I tried that I didn't find satisfactory for one reason or another:
I finally settled on Google My Maps, which is a lesser known option buried under regular Google Maps. (Yes, I know it doesn't make sense that Google has two mapping applications.) This uses pretty much the same mapping interface as regular Google maps, but adds the ability to save maps for reuse later, create layers and export the map to a KMZ file. That ability to export is key.
So here is a super-high-level overview of the procedure that we will follow. I'll break each of these steps into much more detail below:
Make sure you have all of the prerequisites.
A. Create a map in Google My Maps and export it as a KMZ file.
B. Import the KMZ file into Garmin Explore as a new map.
C. Run the Garmin Drive app on your phone to let it pull down your maps from Garmin Explore.
D. Sync your Garmin Zumo XT with your phone to pull the map onto the unit.
Yes, that's a lot of annoying hops just to create a map. Unfortunately, it's the best way I've found (so far) to do it.
There are some prerequisites/caveats to this procedure. You must have these things, or at least the willingness to obtain these things before trying to follow my instructions:
I wrote this procedure for a Garmin Zumo XT GPS unit, so you should have one in your possession. If you have another model of Garmin GPS, this procedure may or may not work. If you have another brand of GPS, this procedure will most likely not work at all.
Google account - This is free to create via Google's website. Most likely you already have one, especially if you're an Android phone user.
Garmin Account - This is also free to create via Garmin's website.
Garmin Drive App installed on phone - Important: Make sure you have the aforementioned Garmin Account already created prior to installing the Garmin Drive app. When you first run the app it will prompt you to log into your account. The first time I installed the app, I didn't have an account created yet, so I skipped the login screen. After a bunch of frustration I then wound up having to uninstall and then reinstall the app to get the login screen to appear again. Outside of the prompt the first time you run the app after installation, I have found no way to get back to the login screen. Also Important! They've made another change since I first wrote this procedure: When installing the Garmin Drive app, it will ask if you want to enable Garmin Explore. Make sure you enable this feature. This will let the Garmin Drive app pull the route information you will be creating via the Garmin Explore web site. If you don't enable this upon installation, once again I've found no way to do it after the fact so you wind up having to uninstall/reinstall the Garmin Drive app.
The above phone needs to be paired via Bluetooth with the Garmin Zumo XT unit.
Note that the instructions below are done with a PC and an Android phone. Perhaps you can do it all with your phone. Or a Mac. Or an iPhone. I haven't tried, so that's why I put this disclaimer in place.
You need a little flexibility. Due to the changing nature of the web and software, things may not still be located in the exact place they existed when I created the screen shots. I'm not able to constantly monitor all of these sites for changes and then update this site, so just know that you may have to hunt around a little if your screen doesn't look exactly like the pictures I'm showing you. As a matter of fact, some of the screens changed a little from the time I figured out this procedure until a couple of months later when I actually sat down to document it. If you're not a person who handles change very well, the internet probably isn't a good place for you.
1. If you're not already logged into your Google Account, do so. Using a web browser, go to Google Maps. This is the "regular" Google Maps site, but don't start creating a route just yet. We have to get to the "Google My Maps" area first.
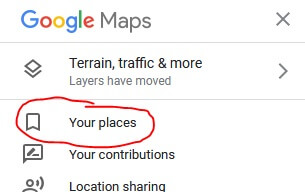
2. On the left hand side of the search box, click on the menu.

3. In the menu, click on the "Your places" option.
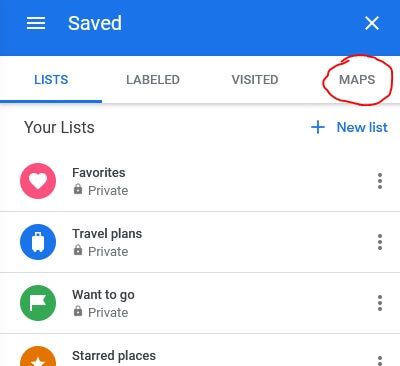
4. Your list of saved places will be shown. There may or may not be things in this list, but that doesn't matter. What you're interested in is the "Maps" tab option from the menu. Click on it.
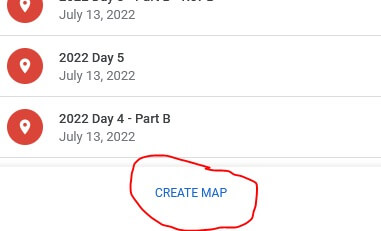
5. Again, if you have any previously saved maps they will be displayed. You may or may not already have maps saved, but it doesn't matter. At the bottom of the list, you want to find the "Create Map" link, and click on it. This will create a new map.
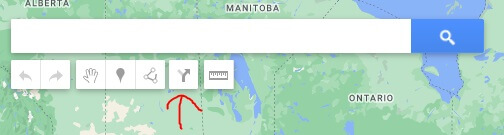
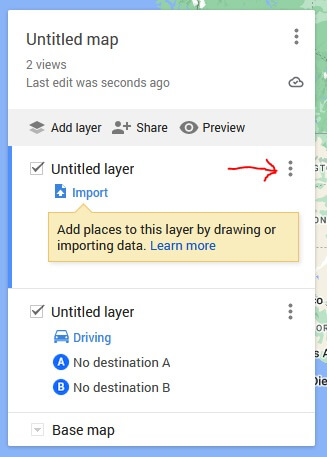
6. This next part is an easy one to miss, but it's key: in the little row of icons, click on the "Add directions" icon. At this point in time it kind of looks like a "Y" with an arrow on one side. This will add a direction layer to the map.
7. You will notice on the left side you now have two layers. The one you just added is the one you want to keep (driving directions layer.) Use the menu on the other "import" layer to remove it from the map.
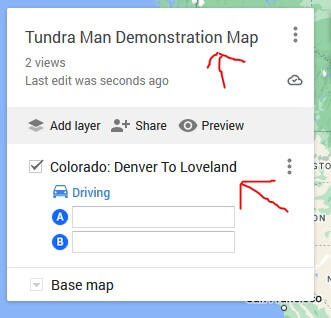
8. Give your map a name, and give the layer a name. Naming your map will help you find it later if you want to come back and make changes. Naming the layer will help later on in the import process into Garmin.
9. Create your map. This is the longest step in the whole process, but also the most fun step. I'm not going to go into a detailed explanation as to how to use mapping programs. There are plenty of other sites and YouTube videos explaining this, so it doesn't make sense for me to recreate the wheel. Also, if you're new to this no matter how many videos you watch, nothing will beat the experience you gain by getting your hands dirty and creating some practice maps.
I will make the following suggestion regarding route creation: maps are created via a series of address points (also sometimes called "waypoints".) The route between the locations added to a map are calculated by the mapping software. When the map is exported from one system to another (I.E. from Google Maps into Garmin) only the address points are brought in. The new mapping software will then recalculate the route between these points.
Why does this matter? Two different software systems may select different roads to get between the same set of location points. This may or may not matter to you, but I'm guessing that if you're trying to create a custom map that it does.
Even if you created the route using specific roads by dragging the map lines around, I've found that there's no guarantee that the GPS unit will bring in your heavily customized map route. I've had mixed success by dragging the map lines around; once I have the map on my GPS device sometimes it works, and other times to my chagrin, it does not.
So for best results, I've found that it works best to put in more address points than you would think necessary. Basically, add enough address points that the only logical way to get between the points would be to use the roads you want to ride. These address points do not have to represent a "stop" in your ride. They can just be random GPS coordinates that you pass by as you ride. Their main purpose is to force the GPS to use the road where the address point is located.
Unfortunately, there are limits to the number of address points that can be added via Google My Maps. I think it's around ten points. What should you do if you need to add more? Break your map up into multiple map files. In the grand scheme of things it's not a big deal to pull over on your motorcycle for a minute and load the next map file. Usually even with really detailed routes I can get several hours of riding on a single map file, so it's not that annoying to have a collection of three or four map files used for a day's riding. I generally could use the short ride break anyway.
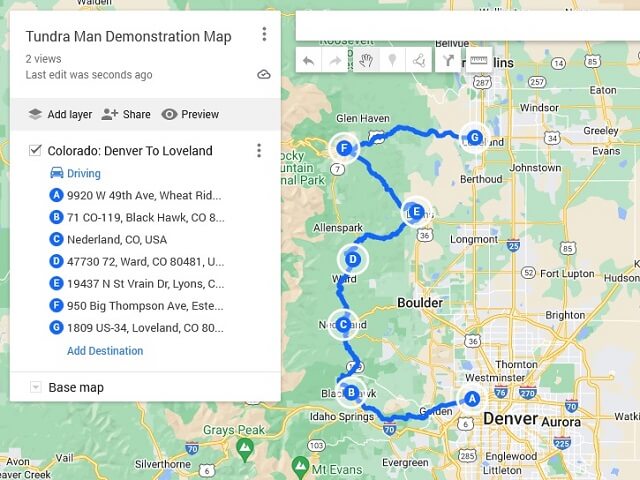
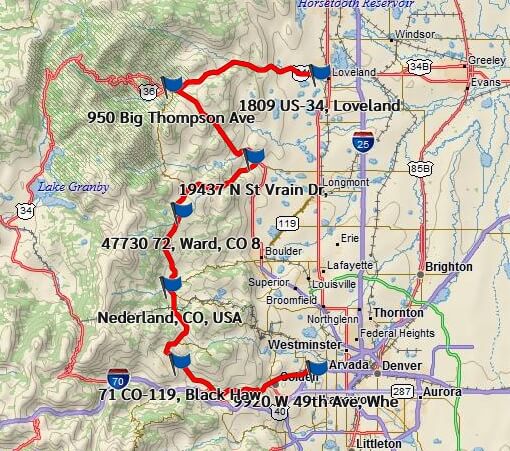
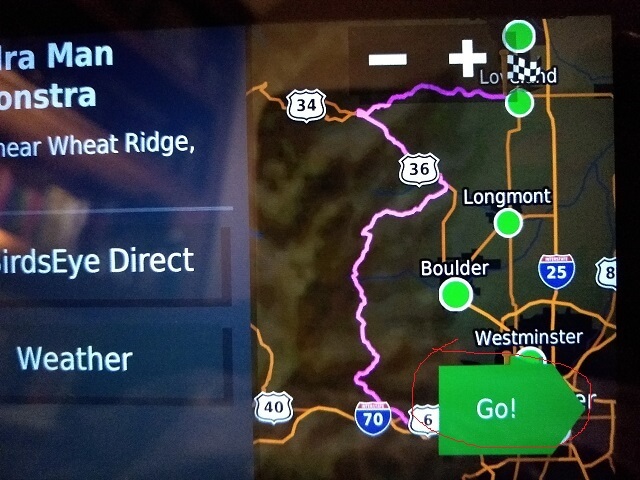
In my example map that I created, I wanted to take the scenic route from Denver, CO to Loveland, CO, using specific roads of my choosing. However, if I just entered those start and end address points into the map, it would have calculated a completely different way to get there (most likely, using Interstate 25 - yuck.) Even if I drug the map lines around, there would be no guarantee that once imported into the GPS that my original route would stay intact.
Instead, I entered my route as seven different address points. This forces the mapping software to use the roads that I picked, rather than the roads it calculates as the best way to get to my destination. Here's my sample map I created:
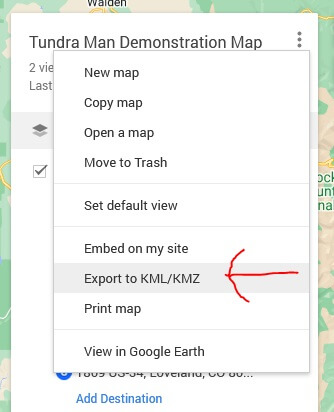
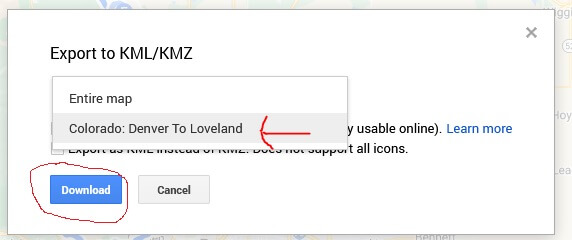
10. Once you have the map created, we need to get it into the Garmin Explore application. We do this by exporting the map as a KMZ file. On the map menu, select "Export to KML/KMZ."
11. When the "Export" window appears, it will default to export the "Entire Map". Change this selection to the map layer you created. Then click the "Download" button. Your computer may ask where to save the file. If so, then select a location you can remember for later. If it doesn't ask, it probably saved it by default in your "Downloads" folder.
Just in case you want a sample KMZ file (or you actually would like to ride the route I created above), here is my demonstration KMZ file that I created.
Ta da! Your KMZ file has been created and you're ready to move on to the next step.
1. Browse to the Garmin Explore Website. If you're not already logged in, it will prompt you. Make sure you're logged in.
2. From the website menu bar, click on the "Map" link.

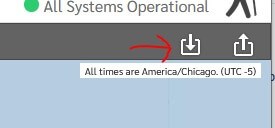
3. The mapping screen should load. Along the top right corner of the screen is an icon that looks like a little square with an arrow pointing down. This is the "import" button, which isn't as obvious as one would hope for. Click on it.
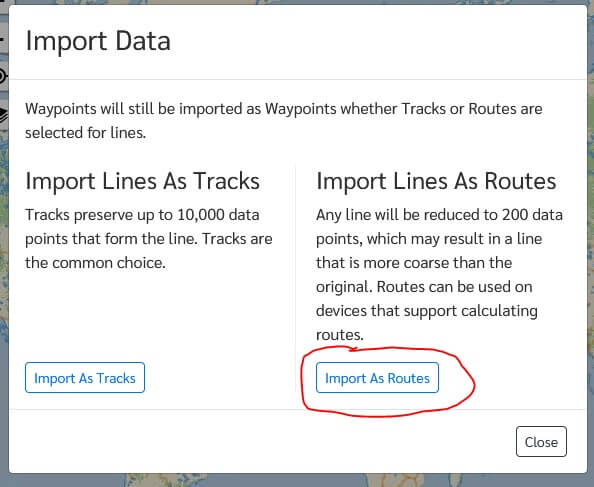
4. The "Import Data" screen should pop up. It will give you two options. Although the window text says that "tracks are the common choice", we want to use routes. If we import our file as a Track we lose the turn-by-turn navigation features of the GPS. Also, if you do make a wrong turn using a Track, the GPS won't help you get back on the right route. So don't use Tracks. Click on the "Import As Routes" button.
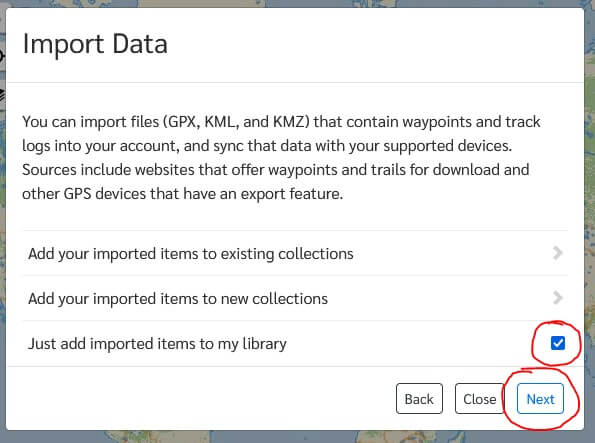
5. The next screen will ask if you want to use collections. You can certainly use collections once you get more experience with this process. For now, just to keep things simple, we'll not use them. Click on the checkbox next to the "Just add imported items to my library" option, then click on the "Next" button.
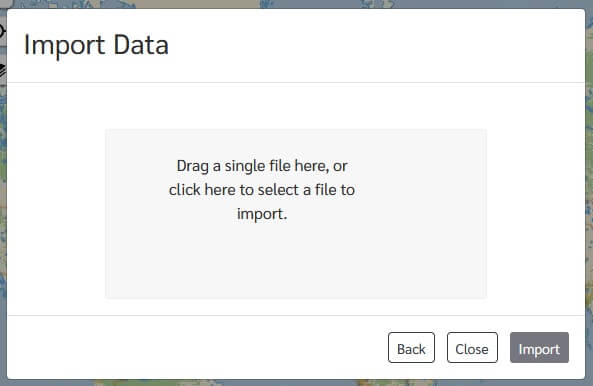
6. Now we need to access the KMZ file that you created back in Google My Maps. Hopefully you remember where it was saved. You can either drag it into the window, or click on the "Import" button and browse to where it is located. Doesn't matter which way you do it, as long as you get the file there.
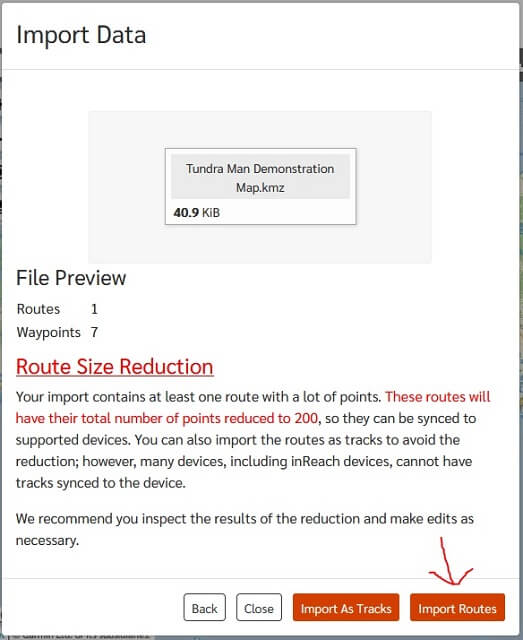
7. With the file selected, you should see its name show up in the box. Then the window will likely give you a big scary looking "Route Size Reduction" message and again try to get you to import the KMZ file as a track. Don't worry about the message, it will be fine. Click on the "Import Routes" button.
8. If all went as planned, the KMZ file should be imported and you should now see the map page with the route you created. Give it a quick look-see just to make sure everything seems correct.
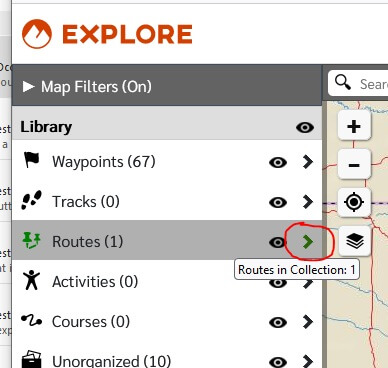
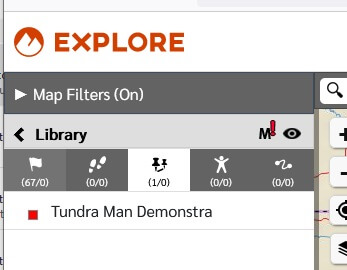
9. On the left side of the screen is the Library menu. There is a Routes collection option that will contain all of the routes you import. As you create more and more routes, they will be added here. You can access and manage them by clicking on the little arrow icon on the right side of the menu.
10. Right now we only have one route created, but in the future I'm guessing you will have more. If you're like me, you generally only use routes once. Once you're done with a route you can go into this route collection and delete the old routes you no longer want to keep. This will keep the route list on your Garmin from getting cluttered up with a bunch of routes that are no longer needed.
Good news! The hard parts of the whole process are done. There are still a few more steps, but they are much less involved.
There's not a whole lot to this step. The big thing is to make sure your phone is connected to the internet, either via Wifi or Data. Then launch the Garmin Drive application if it's not already running.

As mentioned above in the "prerequisites" section, the Garmin Drive application must have already been configured to log on with your Garmin account. Assuming the Drive application can access your Garmin account, this step is pretty much finished. The Drive app should sync up and pull down the route you created. I've never timed it but it seems to happen fairly quickly. I would guess a minute or two tops, if it even takes that long.
Note that (at this time, anyway) there's no real visible indication that the sync happened, or no good way to view your routes on the phone. The Garmin Drive app isn't very useful by itself. The user interface is pretty sparse. Its main purpose is to be a piece of "middleware" that communicates with the internet, and then passes relevant information on to the Garmin Zumo XT unit. That information not only includes the routes you've created, but also real-time traffic and weather information.
The Garmin Zumo XT device communicates directly with satellites to determine your current location. However, the Garmin unit does not talk directly with the internet. Instead, it uses a Bluetooth connection to your phone to talk to the Garmin Drive app. The Garmin Drive app does the communication with the internet. Which is why while riding you need to have the "data" connection on your phone turned on if you want the GPS to display weather and traffic information.
Note that this final section doesn't have to be done ahead of time. You can go ahead and wait to do this last part of the procedure when you're actually ready to begin your ride.
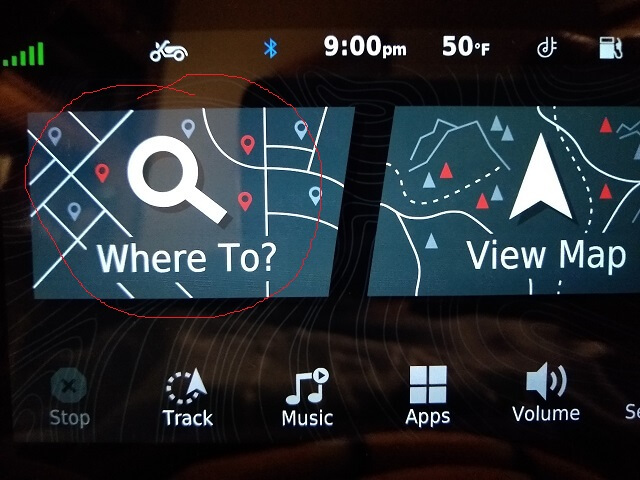
1. Obviously, your Garmin unit must be powered on and have a Bluetooth connection with your phone. From the main screen, click on the "Where To?" option.
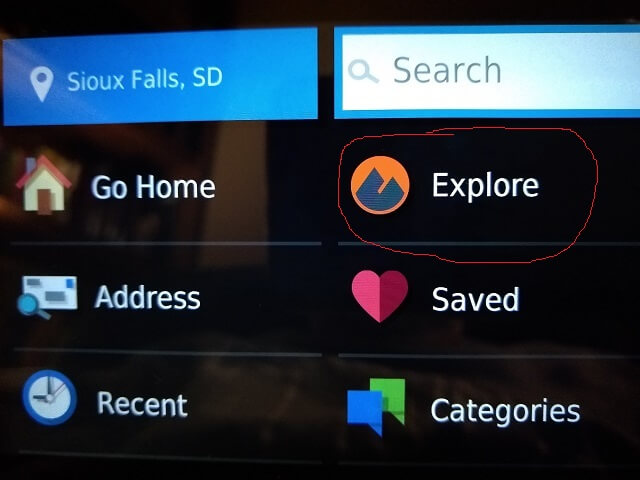
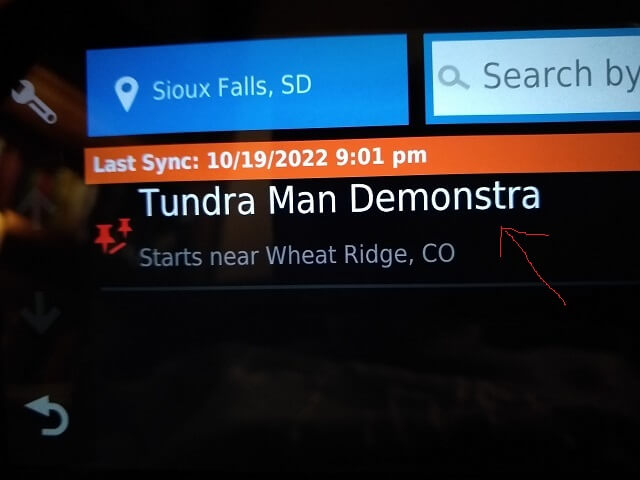
2. From the menu, click on the "Explore" option. From casual observation one would think that this option is used to explore the current area in which you are located. Despite what the verb would lead you to believe, what this option actually does is display the route and track information from your Garmin Explore account.
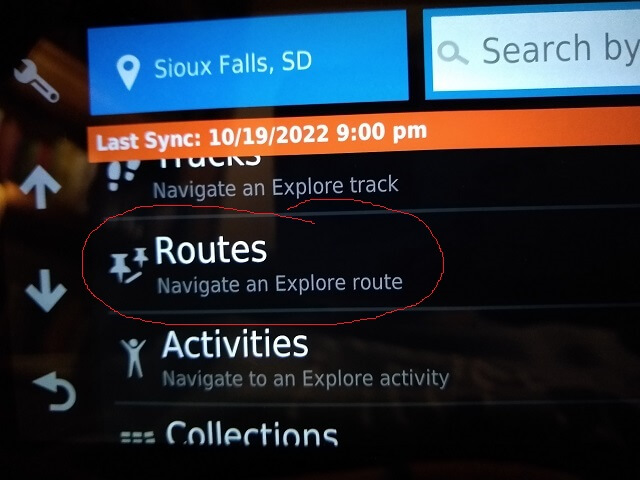
3. Scroll down in the list until you see the "Routes" option. Click on it.
4. Most likely your Garmin has already synced with the Drive application on your phone. If so, the route you created should be displayed. If you have more than one route in your Garmin Explore account, they will all be listed. Find the route you wish to use and click on it.
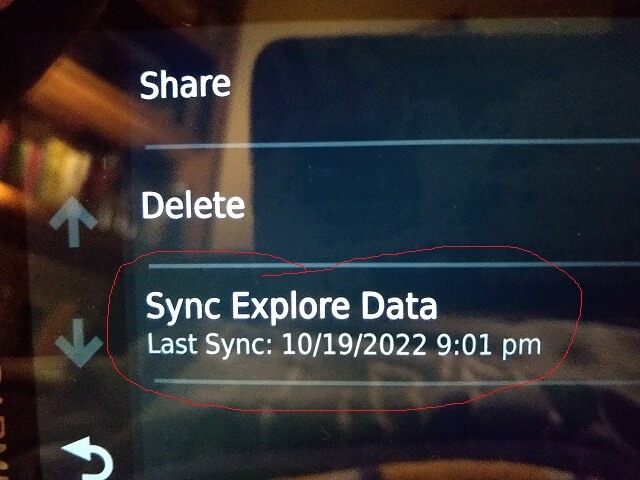
5. Optional: If the route you created is not in the list, most likely it is because the Garmin Zumo XT has not synced with the Garmin Drive app on your phone. Make sure your phone has an internet connection (via data or wifi), and then on the left side of the screen there is a wrench icon. If you go into this "settings" screen there should be an option to "Sync Explore Data." Click on it and the GPS should bring in your latest routes from the Garmin Explore account.
6. A very high level overview of the route should be displayed. Take a quick glance just to make sure it's the route you're wanting to ride, then click on the "Go" button.
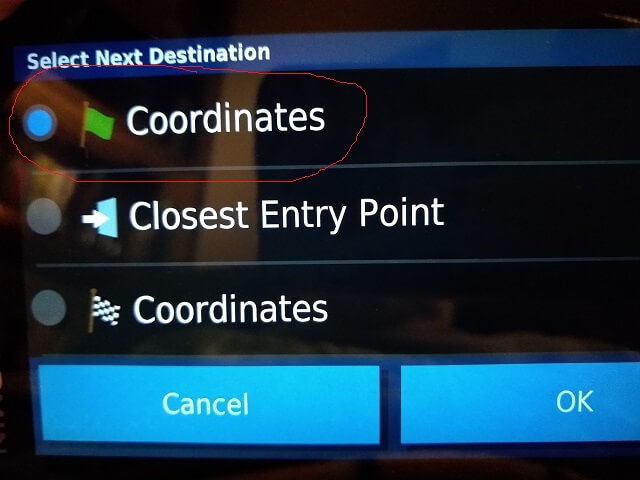
7. I've learned this final step can cause me a great deal of headache. A screen will prompt you to select the next destination. By default, it will select "Closest Entry Point" which seems like a perfectly reasonable option to pick. It may or may not be the one you want. Unfortunately, the meaning of these different options aren't very clear from their title, and the Garmin GPS manual (online) does not state what these different options mean.
This "Closest Entry Point" option works if when you begin the route you are located directly on the spot on the map where your route is supposed to start.
If not, the GPS will tirelessly try to take you back to that point on the map, even if you're already following the route. It will be like the Borg: single minded in its goal and absolutely relentless. What happens is it pretty much makes the route useless, with the GPS continuously telling you to keep turning around to go back to the beginning of the route.
If this happens, through more trial and error I've learned that the solution is to restart the route, and then pick "Via Coordinates" on the "next destination" screen. I'm not sure what this specific option means, but I have discovered that the GPS will then start correctly directing you along the route without trying to take you back to the beginning.
Happy riding!
Return To The Main Motorcycle Gallery
This page last updated on 06/21/2023